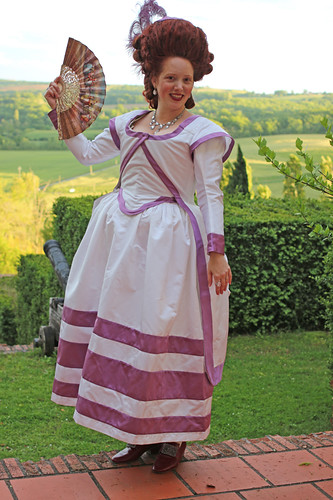
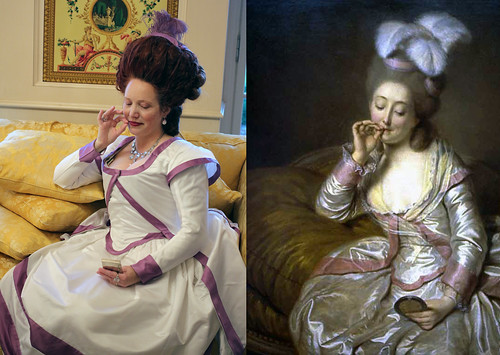
Another new costume that I made for the trip to France was a robe a la circassienne. I was initially thinking that the inspiration image was a robe a la turque — essentially, a later version of the robe a la polonaise, but with long undersleeves and short oversleeves — until I peered a bit more closely at the painting and noticed some of the purple banding on the skirt at the side back. I can’t imagine how that would get there without it being the hem pulled up, which would make this a circassienne (the main difference between the two styles is that the circassienne has the skirt looped up):

This made me relatively happy, because although I was really excited about how pretty the initial drape looked with a long train, there is NOTHING practical about a train when you’re using white silk duchesse satin.
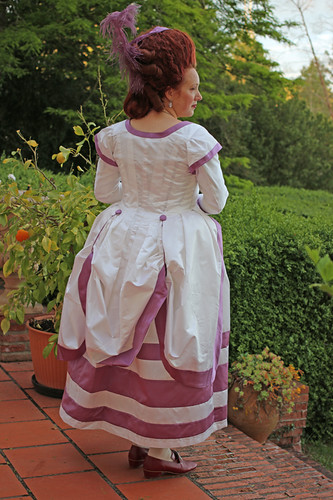
As I may have mentioned previously, draping this sucker was an EXPERIENCE. I decided to do the totally-authentic thing and drape it on my dress form using the fashion fabric. A great idea that’s worked out well in the past, but this time, there were MANY revisions as I futzed and futzed. I was worried about having enough of the (expensive) fabric, and so trying to drape it in an economical way — but instead by revising it multiple times, I ended up wasting a lot of fabric (slashing the armhole, for example). At least I was in love with the back pleats, so that kind of made up for things…
I decided to try some new approaches to the underbodice layer, so knowing that they used separate bodices (called “corsage” in French, I haven’t found an English term yet) I decided to go with that. Plus, I was thinking that the overgown could work fabulously over a chemise a la reine (although more so when it had a train, maybe less so now?) — so I decided to attach the undersleeves to the bodice and only the oversleeves to the robe. I have no idea if this is period, as I haven’t yet been able to identify an extant example, but this is experimental archaeology!
I posted a bit about draping the underbodice here, but to my supreme irritation, what was supposed to be a perfectly fitted back-opening bodice cut on the straight ended up with serious wrinkles. I tried facing the front with some heavy linen fustian, but it was still wrinkly, so I ended up adding a piece of boning to the CF… after which it was still wrinkly. I loved wearing the outfit, but I spent the whole time feeling embarrassed about my wrinkles! You’ll see what I’m talking about in the final photos.


I used bias strips of the purple to create the bands along the various edges (except at the bottom of the underbodice, where I really had to follow the line of the hem). Comparing it all now with the original painting, they’re a little too narrow in places (especially the skirt), but I was in gotta-get-this-done mode, so it is what it is!

I handsewed every stitch of the robe and underbodice, and really wanted to do the same for the petticoat, but I’d run out of time… and fabric! One other reason I wanted to make this a circassienne was the much shorter hem, leaving me some more pieces of fabric to try to piece together to make the petticoat. But I was stuck with a whole bunch of strips. Initially I pictured the petticoat being all white with a purple band at the hem, but as I was looking for ways to piece things, I came across this fashion plate and decided it would be a good way to use up all those small pieces of fabric, PLUS it had an added je-ne-sais-quoi:

I had to order a bit more of the white satin as well as the purple to make it work, and I think in the end I spent only a little less than if I’d just bought enough to make the whole thing white — but again, I think it adds some more flair to the outfit!
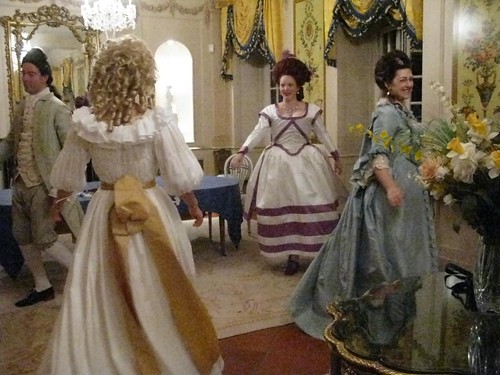
I made fabric-covered buttons with the purple silk, and purple lucet cord out of some silk embroidery floss, to loop up the skirt. At the château, I accessorized it with way more jewelry than the inspiration image, plus a purple ribbon and feather (thanks Fanny for the feather!). And a lot of stomach wrinkles:
And yes, as Sarah kept pointing out, the painting has tons of stomach wrinkles. I DON’T CARE. I couldn’t stand it! After the first wearing, I took off the boning and fustian and took a horizontal tuck across the waistline of the bodice front… which only reduced the wrinkles a little bit. Harumph. So the front of the underbodice WILL get recut, hopefully before Costume College as I’m thinking this will be my gala gown (I have NO desire to take on any big projects anytime soon, after all that sewing for France!).
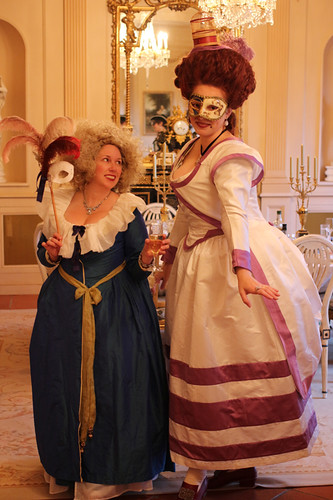
Here it is with the waist tuck, worn with a mask and bird cage for our masquerade evening:
In the end, though, if I forget about the wrinkles, I really love it! Best of all it was perfect for dancing — poor Lisa and Cathy kept getting their trains stepped on, but I was free as a bird.


I really cant decide which outfit I love more, this or your redingote. Either way, I’m thrilled to admire them in person at Costume College. 🙂
I love your new dress! This is very interesting when someone sew a dress of painting. Ah, and your wig is adorable! 🙂
Love it 🙂 regarding the wrinkles, I had a similar experience with a wedding coat, and after asking around the forums found out that duchess satin always wrinkles when you seam it along the grain. So try moving your front seam a few degrees off the grain if you do remake.
Hope that helps! Gemma
I can’t decide which I love more either. The colors are just so striking here and I don’t think I’ve ever seen anything quite like this before. And you managed to look just like the portrait! Drop dead gorgeous!
Thanks for the suggestion! I will try that — was alternately thinking of going back to a bias cut!
The stripes really make the skirt.
Awesome.