I made this tutorial years ago, when I was first experimenting with creating high 1770s wigs. Since posting, I’ve improved greatly in technique and done a large amount of historical research on 18th century hairstyles and wigs. I published all of that knowledge and research in a book — 18th Century Hair & Wig Styling: History & Step-by-Step Techniques.
Because I know this tutorial has helped a lot of people, I will leave it up here, although with the caveat that my book features much better techniques and the designs have been updated based on tons of research!
Supplies Needed
Long wig in a color that matches your own. Human or synthetic hair. Wavy or curly works best, but you can use straight. Try to find one with a center part. No bangs; if there are any layers, they should be long layers.
False hair. Extra false hair can be used to fill out the wig, make side and back curls, make the pinned-up ponytail that you see on some wigs, and make lovelocks (long, dangling curls). Try to get hair that is already sewn to a net (for example, you can buy the ponytails that are attached to a jawclip — take it off the jawclip and then you have a flat net attached to the hair).
Wire mesh, the smaller the holes, the better.
Wire cutters.
Pliers.
Thin wire to sew the mesh together; needs to be bendable.
Wig clips, also called toupee clips. Large size, to coordinate with your wig color.
Bobby pins. About a million.
Sewing thread in a color to match the wig.
Needle.
Hairnets in a color to match/coordinate with the wig.
Hairspray – aerosol, the strongest you can find.
Styrofoam head or other base on which to style and store the wig.
Teasing comb.
Start with a wig that matches your own hair color (if you don’t, it will be difficult to blend your own hair into the wig and hide the wig hairline). Synthetic or human – doesn’t matter. It should be long, preferably curly or wavy, preferably with a center part. No bangs under any circumstances. Layers are okay so long as they are long layers, but better without. This is the wig I used: a long synthetic wig I bought on ebay for $50.
Sew wig clips to the inside front hairline of the wig, one on either side of the center. My wig has a side part, which is why this looks off center (the yellow pin is the center).
Attach the wig to the base – in this case, a styrofoam head. I attached mine with pins.
Starting from the crown of the head, comb the hair all around the head (including over the face, Cousin It-style) so that it is evenly distributed. Remember you have lots of hair down the back of the wig, but not so much in front, so push more hair towards the front than you think you want.
Make your form. I made mine from wire mesh, sewn together with wire. This has the advantage of being able to pin into. My first attempt at a poufwas made using a fabric “bag” stuffed with pillow stuffing — not only did it fall over bit by bit, but I had to sew the hair to it which sucked. I’ve heard of people using the foam frogs that are used for arranging flowers, but I have no idea how you accomplish the next step… You may need to experiment with your base shape to get it to work. Look at period images for an idea of the shape. This was my second attempt – first attempt was taller and narrower and made me look like Marge Simpson. The wig usually leans back towards the crown of the hair, so keep that in mind as you make the form.
Sew the form to the wig using standard sewing thread and a big needle.
Now we’re ready to style the hair. Start with the front. Take pieces of hair, hairspray the life out of them, rat them with your teasing comb, hairspray them again, and bring them up to the top of the form.
To attach the hair to the form, use bobby pins to pin into the wire mesh. Start with an X shape; after that, you’ll be overlapping so many pins that you won’t need to keep consciously doing Xs.
Keep hairpsraying, ratting, hairpsraying, pulling up, and hairspraying until the front of the form is covered (don’t worry if you can still see wire at this point). Keep bobby pinning the hair into the same top point. Keep at least 1″ thickness of hair free all along the front hairline.
You will probably want more hair than your wig has. Take a swatch of hair from your extra hair and attach it to the base of your form; bobby pin it into the wire mesh (you could also sew it to the wig).
Pull that hair up, hairspray, rat, pull it up, and hairspray just like you did previously.
You should now have the front of your form pretty well covered. Don’t worry if it looks messy. Hairspray some more – you can’t use too much.
In back, you may have extra lengths of hair falling from where you’ve pinned it. Great, you can use this to cover the back. Comb it out and spread it along the back of the form. Hairspray.
Back to the front. Take that 1″ thickness of hair that you didn’t tease/pin up. Comb it and smooth it over the form and the teased hair so that you have a smooth outer layer. Pin it at that same point in the top. Hairspray it as if your life depended on it. Start with the center of your hairline…
… and then do the sides. Wherever your wig has a part, this smoothed hair will want to open up – take extra care to hairspray and then comb that hair together. Hairspray some more.
Now we have some more extra hair in back. Do the same thing you did before – spray, smooth it over, spray.
Hairspray, then pull up the back hair to go up to that same point at the top of your form, laying it on TOP of the smoothed extra front lengths. No need to rat this hair, you should have enough thickness without. You can’t see it here because my hand is over it, but you may wish to keep 1-2 long curls free from the back to create lovelocks. These should come from the side back along the bottom hairline.
Start with the center back, then do the sides. Hairspray, hairspray, hairspray. You’ll have some extra lengths at the top again.
Do something interesting with these extra lengths – just avoid anything that looks like one big bun. I did two small flat curls so that I ended up with a figure 8. Did I mention hairspraying?
The basically finished wig. Here you can see the hair set aside to be a lovelock.
The relatively finished back. See that can of hairspray? Use it
To make side or back curls, take lengths of hair (again, handy if they are sewn to a net or something else so that you have tension on one end). To make large side curls, curl the hair around two fingers. This was what I did in these pictures; later, I replaced these with narrower curls that I made around a thick pen.
Cover each side curl with a hairnet. You will have lots of extra hairnet; pull it taut…
…and then stuff it inside the curl. Trust me, if you don’t use a net, no matter how much hairspray you use, the end pieces will separate and flop around as you wear the wig.
Attach the curls you’ve made to the wig using bobby pins in X shapes. This was my attempt at fat curls, and I did two side by side. When I switched to narrower curls, I was able to get one long length of curl, which I thought looked better. Look at period illustrations for other options for adding extra hair, including back curls and the long, pinned up ponytails you sometimes see. I think it’s time for some more hairspray, what do you think?
To wear the wig, pull 1″ of your own hair free along your hairline. Note that your hair often gets thin right at the temples, so you may want a bit more there. The rest of your hair can go up (bun, french twist; I like to make two braids, which I stuff under the wig in back – weirdly, it works). You can use a wig cap if you like. Start by taking the front of the wig and use the sewn-in clips to clip it to your own hair. This will do the bulk of the work of keeping it on. Pull the wig over your head, and use bobby pins in X shapes right above your ears and along the back hairline on either side to make sure it doesn’t creep around.
Take that 1″ thickness of your hair, hairspray it, and comb it up over the wig — just like styling the wig. Make goofy expressions at the mirror. I tried the wig on just for this tutorial, so I’m not using hairspray in my own hair – hence why it looks a little messy.
This will mask the wig hairline. If your hair isn’t long enough to reach the top part, just spray the bejesus out of it. If it is, go ahead and pin it at the same point with bobby pins in an X shape, then do something stylish with the ends (which I haven’t done here because I’m about to take the wig off again). Hairspray the crap out of your front hair.
Back shot.
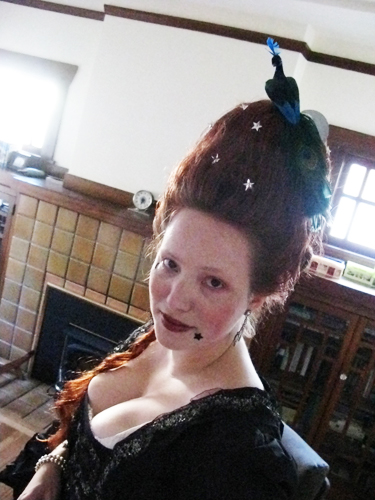
You can style your pouf however you like – there is no end to the crazy crap they put on their wigs. Note that if you are going to work your own hair into the front of the wig as I have shown, you won’t be able to put anything decorative into the front of the wig – you’ll need to put it on, then add decorative elements. This style is Night – I put the front silver stars and peacock on after I put the wig on and worked my own hair in.
Make sure you store the wig on a styrofoam head or other base so that it keeps its shape.
15 Replies to “1770s High Wig Tutorial”
this is great! thank you so much!
Your tutorial is fantastic! Very helpful, very inspiring and it made me laugh! Thank you so much!
LOVE!
Thank you for writing this tutorial. I now feel that I can create my own wig instead of buying something ready made, and not as good looking. (Still secretly wish to do it with my real hair though.)
Thanks so much! I just finished mine yesterday. I followed your tutorial pretty much exactly and I’m soooo pleased with the results. So glad I did it instead of buying one the lame plastic ones from the Halloween store. I made lots of curls down the back and ended up putting a bouffant hairnet over the whole thing so they wouldn’t flop around while I was handling it. I think I may even wear it with the hairnet lunch lady style. 🙂 Thanks again for the great tutorial!
I love this!!! I just styled my second wig with your help. I did the first one a little over a year ago, and got so many compliments. I have an event this weekend and felt the need for “new hair” so I just styled a new one.
Thank you!
Fabulous!!! Love the hairspray comments! Gave me a good chuckle!! This goes on my list of things to do which means maybe sometime this decade!!
Wow very nice. I am going to try it with batting. I like the powder hair look. Thank you very much.
Brilliant tutorial, thanks for sharing this great ‘how-to’, definitely sharing!
Kendra–I took your class at Costume College a few years ago and it was awesome! It helped me turn a crappy 18th C. wig into something I can now wear without feeling embarrassed. Do you know where to find a little ship to mount on top of this hairdo? Thanks.


this is great! thank you so much!
Your tutorial is fantastic! Very helpful, very inspiring and it made me laugh! Thank you so much!
LOVE!
Thank you for writing this tutorial. I now feel that I can create my own wig instead of buying something ready made, and not as good looking. (Still secretly wish to do it with my real hair though.)
Thanks so much! I just finished mine yesterday. I followed your tutorial pretty much exactly and I’m soooo pleased with the results. So glad I did it instead of buying one the lame plastic ones from the Halloween store. I made lots of curls down the back and ended up putting a bouffant hairnet over the whole thing so they wouldn’t flop around while I was handling it. I think I may even wear it with the hairnet lunch lady style. 🙂 Thanks again for the great tutorial!
I love this!!! I just styled my second wig with your help. I did the first one a little over a year ago, and got so many compliments. I have an event this weekend and felt the need for “new hair” so I just styled a new one.
Thank you!
Fabulous!!! Love the hairspray comments! Gave me a good chuckle!! This goes on my list of things to do which means maybe sometime this decade!!
Wow very nice. I am going to try it with batting. I like the powder hair look. Thank you very much.
Brilliant tutorial, thanks for sharing this great ‘how-to’, definitely sharing!
Where can buy the men’s suits and wigs ?
Kendra–I took your class at Costume College a few years ago and it was awesome! It helped me turn a crappy 18th C. wig into something I can now wear without feeling embarrassed. Do you know where to find a little ship to mount on top of this hairdo? Thanks.