démodé
adjective:old fashioned, out of style, unfashionable [from French, the past participle of démoder "to go out of fashion," from mode "fashion"].

the concept
 |
| 1760s second mourning gown |
the fabric
the pattern
the deadline
the result
what's on the dvd player?
 |
| Marie Antoinette |
useful links
La Couturière Parisienne
bibliography
Arnold, Janet. Patterns of Fashion: English Women's Dresses and Their Construction, c.1660-1860. New York: Drama Book, 1984.
Baumgarten, Linda. Costume Close-Up: Clothing Construction and Pattern 1750-1790. Williamsburg, Va.: Colonial Williamsburg Foundation, 1999.
Fritz, Paul S. "The Trade in Death: The Royal Funerals in England, 1685-1830." Eighteenth-Century Studies 15(3): 291-316.
Hart, Avril, et al. Fashion in Detail: From the 17th and 18th Centuries. New York: Rizzoli, 2000.
Riberio, Aileen. Dress in Eighteenth-Century Europe: 1715-1789. New Haven: Yale Univ. Press, 2002.
A Lady of Fashion: Barbara Johnson's Album of Styles and Fabrics. Natalie Rothstein, ed. New York:
Thames and Hudson, 1987.
|

Tuesday, August 19, 2008
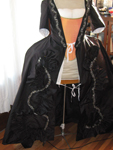
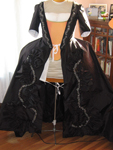
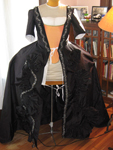
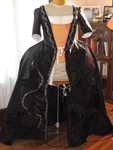
Yes, I finished this forever ago. No, I never updated it here! That's because it was all trimming, trimming, trimming, under a mad deadline to finish in time for Costume Con 26.
I ended up going with the very first, original trimming option (see my last post), because I had underestimated how much of the black/silver lace I had! I did mess a bit with the shape to try to get the silver to create a prettier line, mostly by curving it farther at the top and bottom. For trimming the petticoat, I turned the black ruche on its side (horizontal) - unfortunately I didn't have enough of the black/silver lace to add here. I did have just enough to go around the sleeve openings, which was an element I really wanted.
I did manage to get this done in time for Costume Con, but felt very "meh" about the dress on the form in the exhibit. Didn't help that it was way in the back, but still - it just looked kinda shlumpy and unexciting. I have a few pictures from the exhibit, but they're really not worth posting.
So I was feeling unsure about how excited I was to wear this at Costume College, which was my next opportunity. Imagine my surprise when I hauled it out, put it on, and it looked FABULOUS. The only thing that needs a bit of tweaking is after sitting in the closet for a few months, the black ruches aren't holding up quite as well as I'd like, so I need to tack the trim in a few places to get the fans to stay up.
I guess it's the total package (costumer + dress) that's more important than just the dress itself! The hair also helped, as I made a HA-UGE 1770s wig to wear with this (more on that soon - I took lots of pics so I can post a tutorial, plus I hope to offer a demo at Costume College 2009).
So, for posterity, here are final photos - many thanks to Trystan and Jenny-Rose for providing pictures when my own camera crapped out on me. And Jenny-Rose took this stealth video, which I love because it captures my favorite thing about wearing a francaise at Costume College - something about the air flow in the hallways makes it swoop out behind you like nobody's business!
posted by démodé 3:32 PM
Monday, March 24, 2008
Thanks to Sarah, the hem has been marked and sewn. However, while hemming I realized that I was, yet again, having problems with the skirt openings being wonky. This seems to be the cross to bear with this style of dress, or maybe it's just my bad luck? So we did some futzing and pleated the skirt up a bit at the waistband, as in my two previous francaises. I'm hoping that'll do the trick, but I'm grumpy about it. I also think I may need to pull out the under-the-pleats stitching in back and redo it - it's looking a little wonky on. Sigh!
But the end is in sight, as I've been busy working on trimming. I first made the black taffeta ruches, as in the yellow dress in Historical Fashion in Detail (see previous post). I made a stencil for scallops and cut it out with my pinking shears; the rotary cutter just won't seem to make a small enough scallop. I've finally figured out the trick to hand gathering - lots of fabric! There's no slight easing - you've gotta do about 2:1 gathers.
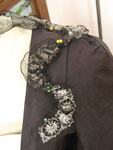
Then I pinned on the silver lace, which is where the design question came up. The dominant shape is the black taffeta ruche, but the dominant color is the silver - and the shape I was originally planning is just a bit weird to the eye, as it's more of an accent:
 | | Look at the trim on the left |
So then I messed around with a bunch of options:
 |  |  | | (On right) Tracing the line of the black taffeta ruche - no good, because the center line of that is wonky too | (On right) Straight line of silver down skirt edge, no silver on black taffeta ruche - no good, because you can't see the black taffeta ruche at all! | (On left) Straight line down skirt edge plus accent on black taffeta ruche - yes, I think? |
I think the last option is the best, if I extend the silver lace a bit at the top and bottom so that it overlaps the black taffeta ruche enough to extend the top and bottom of the "S" shape.
So now I need to sew down that, futz a bit with the fitting as mentioned above, make sleeve ruffles, and then figure out how I want to trim the petticoat. I'm thinking some version of what I have on the skirt panels, but turned horizontal? I'm thinking on the sleeves to just do a row of the silver lace around the armhole, on top of the ruffles, where they are attached to the sleeve. I also want to make one of those ruffle-y neck thingies that you see in the portrait -- I'm thinking 1-2 layers of black taffeta, with the silver lace in the middle. For right now, I doubt I'll get to the white/off-white chemisette-looking thing -- if ever?
posted by démodé 1:17 PM
Thursday, March 6, 2008
And now I can report that having the flu really slows down sewing, too! Scientific research - you get it here!
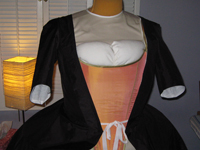
All I managed to do over the weekend, besides be sick, was the stomacher. Super easy - just traced it off my peach francaise stomacher. It's a layer of silk wrapped around a layer of linen - the linen is cut to shape without a seam allowance; laid that on top of the silk, marked around it with tailors chalk, and just cut rough seam allowances.
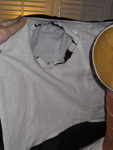
So here is the all-done, pre-trimmed view (minus a hem on the robe), as well as a shot of the petticoat without the robe over it:
So then it was on to trim land - except when I started pinning trim, I realized that I'd neglected to bind the back neck edge. Whoops!
Okay, NOW trim! Here is the trim that's inspiring me right now, from Historical Costume in Detail. I love the twist/fan in the ruche:
I thought I could do something similar with the lace, and have that cross over/under the taffeta ruches... but experimenting showed me that this looked dorky. As did boring, straight ruches. I ended up going with a slight curve to the ruches on the bodice; I will do the twisted ruches, in taffeta, on the skirt, and cross those with lace - not sure if the lace will do anything fancy other than be gathered up. Here are 5,000 pictures of trim experiments, ending up with the curved pattern I ended up going with:
posted by démodé 2:32 PM
Thursday, February 28, 2008
Whew! When you handsew things, it can take soooo much longer to do something that usually just takes a few hours. I worked most of last weekend on this, and only did the bodice lining and the sleeves. However, I will say that doing this the "period" way makes my toes twinkle, and I so enjoy handsewing, that I'm not complaining... just commenting!
Sadly, my husband took the camera away with him for the weekend, so I don't have process documentation. However, you won't be missing much!
The bodice lining process you can see documented on my peach francaise diary. The reason for draping the robe without the lining first is that linen tends to stretch, while something tightly woven like silk taffeta won't. I'm not the expert here, but what I found worked best was to align the selvage edge of the linen with the front opening of the bodice, and to pin those straight together from about the bust point to the bottom of the bodice opening. Above that, I had to go off grain from the selvage on the lining to account for the dart/tuck I'd put in the robe/silk. From this bust-waist section, smooth the linen over to the side seam, keeping the grain straight, and pin along the side seam. Then pin along the waist seam. It's the above the bust point stuff that'll go off grain, and here it was just a matter of smoothing and pinning, pushing excess fabric into the negative space of the armhole, and the negative space where I was going to cut the bust-to-shoulder CF opening. Clear as mud?
 |
I based my sleeves off of those I draped for my peach francaise, so I don't have process photos for you. I knew I wanted to make some slight adjustments, namely that I had cut (on the recommendation of Janea Whitacre) the sleeve hem as a straight line, but I wanted that curve/dip over the elbow that you see in a lot of dresses, so I added that to my pattern. Basically, I can tell you that the sleeve IS drapeable, it's just annoying to do so! If you take the extra piece of fabric from when you ripped your side gores (which, if you'll remember, are however long by 30" wide) -- take that other 30" wide and rip it into 3rds lengthwise. 1/3 = sleeve 1, 1/3 = sleeve 2, 1/3 = stomacher. Pin one of the squares into a cone shape and push it up on the arm, pinning to the armhole and cutting away. If your sleeve is too narrow at the armhole, you can put a gusset into the sleeve seam.
So here's where it's at!
 |  |
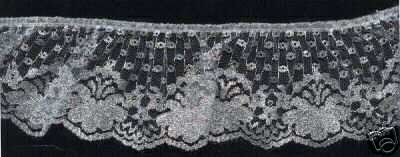
My trim options arrived - I bought both the antique black/silver lace and the antique black/silver trim, both from ebay. I was excited to find that there wasn't 2.5 yards of the black/silver lace but rather 12.5 - wow! I wasn't sure which to use, until the trim arrived - there's 10 yards, but unfortunately pieces of it are so tarnished (ie black) that there's only 7 usable yards. So I'm going to keep that for something else, and use the black/silver lace. The only hitch was that the edges of this weren't finished, so I spent a long boring hour doing an edging stitch on my machine to all 12 plus yards... Here's some ideas of how each trim would look; again, I'm going for the lace, as it's got the yardage I want (plus, I won't have to spend extra money I don't have on black organza) -- I'm going to mix the black lace with black taffeta ruches. I have a plan and some source material, but haven't uploaded those pics yet!
 |  |
posted by démodé 12:42 PM
Tuesday, February 19, 2008
It's starting to look like a dress - all very exciting!
I spent the weekend working on the skirt front. Again, I cut my bodice separate from my skirt - this was my first time draping it this way, so it was a bit of an experiment.
The skirt piece should be 30" wide (half of your 60" wide fabric), and the length should the length of the CF seam (plus top turnover and hem), remembering that that seam is angled in an upside down V. Luckily, I have my peach francaise to measure all of these things off!
Attached to your skirt front is a side gore. This is a 30" wide piece of fabric; length should be the same as your center front piece's side seam (which may be longer than the CF edge). Fold it over, so that you have two gores that are 3" wide at the top, and cut it on the diagonal to form two gores; the straight edge is sewn to the center front piece, the diagonal edge will be eventually sewn to the back skirt seam.
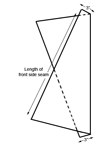 | 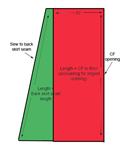 | | How to cut the gores | Sewing together the center front (red) and gore (green) |
I draped this inside out at the top -- in other words, I folded over on the outside to drape, but when I sew it the extra at the top will be folded inside.
I started by figuring out the length of my CF opening plus hem, and pinning the top of the CF to the bottom of the bodice opening. Then I roughly figured out how much fabric would fit along the waistline, and pinned the skirt to the waistline at that point.
Then it was a matter of futzing with this line - slashing, repinning, slashing, repinning, being very cautious! The excess fabric (which was hanging out past the area I'd been fitting) can do various things, depending on era and style. My favorite is to make 2 large inverted knife pleats, which will make the fabric drape over the side hoop very dramatically. You can see these pleats, again inside out, in the middle picture.
After I'd finished draping one side, I took a pattern off of the skirt pieces and cut the other side. My finished pattern ended up looking something like this:
I did take some pictures of the robe with both sides of the skirt attached, but I forgot to upload them... next time!
posted by démodé 2:21 PM
Wednesday, February 13, 2008
Trimming - what to do! It's been on my mind for a while, and now I'm starting to shop around, so it's REALLY on my mind!
My first thought was, "Aha! I shall faithfully recreate this portrait." Followed by, "The details of which I can't see." Followed by, "Oh, well I'll just find something similar and use a similar trimming pattern!" Followed by, "I don't want to spend a bunch of money and time to trim the bejeezus out of this dress, only to have it be black on black on black and totally not show up."
So! Now I turn to you, trusty pin posse, to advise me on what to do.
The original portrait, as you can see from pics below, is trimmed with self-fabric ruches and fly fringe (notice especially on the stomacher and sleeve ruffles, where you can see the fly fringe). Ah, how lovely and decadent to do all this trimming that won't show up! I am not so decadent, myself. I want SOMETHING to show up. So, that leaves out self-fabric/fly fringe, one of the main trimming options for this era.
So here's what I've come up with -- what do you think? Note that I have decided to branch out from standard mourning colors of black & gunmetal for trimmings, as they have been damn hard to find, to also include silver (which would very much be pushing the whole "mourning" concept, but would certainly pop visually!).
Option #1: Black organza ruches with metallic trim.
Credit goes to Bridget for thinking of this one. Something like the below portrait (ooo, I like the compere [button front] stomacher!), with ruches in black organza (sheer and fluffy will hopefully visually pop at least somewhat), with some kind of narrow shiny trim like one of those pictured.
 |  |  | 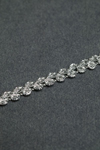 |  | | 1770 Maria Luisa of Tuscany | 1/4" beaded daisy trim - gunmetal, would be perfect but at $6/yd it's way too expensive | 3/8" silver/black braid - super cute and very period fly fringe-esque, but would the black bits get lost? | 3/8" silver braid - too much silver? | 3/8" antique(?) silver black trim |
Option #2: Silver or silver/black lace, with or without self-fabric ruches.
 |  |  | | 1764-65 Maria Luisa Bourbon - brings in possibility of doing something different on the stomacher? Picture the lace here as metallic | 1769 Queen Charlotte - metallic lace (pretend it's silver!) | 1770s Marie Antoinette - combination of metallic lace and self-fabric ruches |
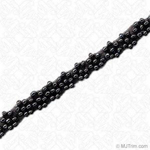
The problem with all of this is finding the right lace -- most of what I've been able to find is this very stiff stuff:
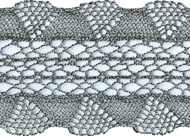 | This type of lace comes in a variety of widths, mostly very narrow to about 2-3" |
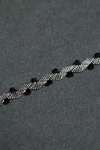
Lighter weight laces are SHOCKINGLY hard to find right now! Here's the best I can come up with:
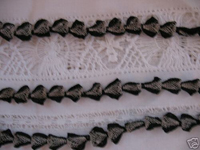
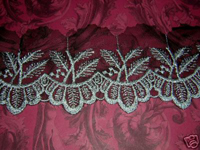 |  | | 3" silver/black Venice lace | 2.5" silver ruffled lace - ruffled could be a problem | 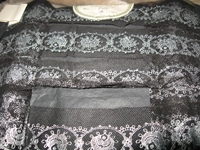 | 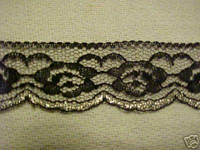 | | 1.5" vintage silver/black lace - on a whim I bought this, only 2-2.5 yds, so would only work for a differently-trimmed stomacher | 1.25" black/silver rose lace - the rose seems cheesy to me, plus that's pretty narrow |
posted by démodé 4:11 PM
Monday, February 11, 2008
I am switching off working on this with my secret Costume Con masquerade project, so I'm not moving as quickly as usually -- but everything is coming along swimmingly with both projects, and with 2.5 months to go, I'm quite happy with my pace. It just means that there may be slow periods with this!
Now that I'd finished the back, it was on to the fronts. When I draped my last francaise, I went for the oh-so-period method of draping one side in taffeta, then cutting the other side to match... without ever making a pattern. Why? Why?!! So here I am, off to make another dress, knowing I have a perfectly fitted dress and so could have had a perfectly fitted pattern.... This time, I made a pattern!
Caveats for the below: All of my calculations are based on using 60" wide fabric. I don't have it in me to do a detailed bodice draping tutorial, so I'm just documenting what I did and what worked for my shape, not going over every in and out on how to drape.
The fronts should be the length from the shoulder seam (which is way towards the back), over your bust, down to the waist, and then down to the floor... plus a bit extra for screw ups! Luckily, I was able to measure my last francaise (it's been so handy to have that hanging right next to my sewing table!). Rip a piece of taffeta this long, and then rip it in half lengthwise - so each front starts with a 30" wide piece.
Now, there are a couple of ways to do the front... by which I mean all-in-one or separate bodice and skirt. Everything I say here is a generalization, and you would need to figure out which era and style you want. But basically, the earlier dresses (1750s and earlier) are often cut without a front waist seam... take a look at extant garments, and you'll see a looser fit around the waist. 1760s and later tend to be EITHER cut in two pieces (ie separate bodice and skirt), or the method I used on my last francaise (all one piece of fabric, with a big tuck at the waistline to create what looks like a fitted seam at the waistline).
I spent a HUGE amount of time on my last francaise futzing with those waist tucks. The problem was, although I cut the two sides symmetrically, the skirt opening wasn't hanging symmetrically. I futzed, and futzed, and ended up doing different things on different sides, but was able to come up with a relatively symmetrical V. Well, f--- that on this sucker! I'm going separate bodice and skirt, baby. But either way, you'll want to start with this full length of fabric, and then cut away what will become the skirt... remember, that extra length for screw ups is key here!
So first things first - the robings (the pleated edge). Starting with the selvage (lovely finished edge), I pleated the fabric twice, so that I had the pleats on top of the garment, ending with the selvage along the edge.
 |  |
Then I pinned that pleated edge, starting at the shoulder seam, over the bust, down to the waist.
Then I smoothed the fabric along the torso, around the body to the side back seam. The excess fabric is up in the armhole/shoulder area.
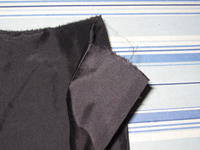
Then I slashed into the armhole area, pushing the excess fabric up into a "tuck" (what we would call a dart) in the shoulder "strap" area (this tuck/dart is hidden by the robings), and cut away excess fabric from the waistline and side back seam. I've found that you can drape this style without a tuck/dart if you're aren't relatively busty -- on my peach francaise, I was able to forgo this, I think because I was draping a relatively wide front (which I later fixed by adding fabric... go see that diary for that process). On this one, I wanted to be careful to maintain a nice close opening in front. If you have some angle at your bustline, you may end up with excess fabric, which needs to go somewhere. Check out the cherry francaise in Janet Arnold for an example of a period dress with a tuck/dart under the robings.
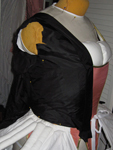 |  |
Here is me attempting to put this sucker on with only one bodice front, and without the back pinned down -- ie without help! -- just to see if I've majorly screwed up in any way. As always with my dress form, things fit but are a bit too big (yay, easy fix!).
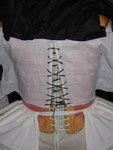
Now it was time for help. Luckily, I hung out with Bridget on Saturday, so I convinced her to come over to my house on her way home and fit my bodice. I love Bridget's fittings, because she is like me - super precise! She tweaked things (mostly at the side back seam) and we had a fitted bodice front.
The period method, which I love and works so well with easily-creasable silk taffeta, is to mark the seamlines by creasing or pressing them. Here's the bodice, unpinned, with the seamlines pressed -- side by side with a Photoshopped version where I highlighted all the seamlines in white. Again, this is what worked for my shape, not necessarily for your's! I added arrows so you can see which directions the pleats go.
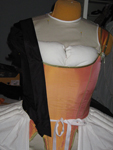
Then I made a pattern from this piece (I may be slow, but eventually I learn!), cut out the second side, pinned everything together, and did the final try on (in the kitchen, while my husband cooked dinner):
In the next post... what gets stitched and how!
posted by démodé 12:02 PM
Tuesday, January 8, 2008
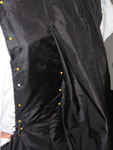
More work on the back of the robe!
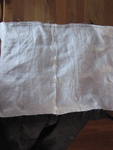
As I mentioned before, the back lining is two squares of linen, sewn together for the top 2-3 inches at the CB but below that open for lacing. I found it easiest to fold back the edges into the bone casings for the whole length, but sew together at the top with a backstitch for strength. The bone casings are also sewn with a backstitch. Mine are about 10" long.
Then you want to create lacing holes on either side of the bones. I've done my share of hand sewn eyelets, but I have to report that the first time I did them on LINEN I went "OHHHH!" Linen is SO easy to make holes in with the awl, and they stay open nicely as you sew them (unlike the tighter weave of cotton or silk).
I'm worried that my lining may be a bit too short; I'm planning to bind the edge so I don't lose any length, but I may end up making a pretty wide binding and extending the boning/lacing down into it. We'll see! It needs to be long enough to reach the waist, so that I can tack the skirt pleats to it... but that's another post.
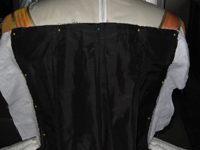
The black taffeta is folded up over the "head" of my dress form in these photos.
 |  |
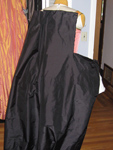
Then I pinned the lining/taffeta onto my dress form, keeping the lacing open (probably about 2" at the waist?). On my peach robe, I put together the lining with the CB closed, and then realized that I had lost my adjustability factor, so had to put in darts parallel to the lacing. Basically, I'd advise that you go for a bit of space in there; lots if you think you're likely to need to lace the robe tighter, or keep it closed if you think it's likely you'll need to lace it looser. I went for somewhere in between.
Then once I was sure the lining was pinned smoothly to the form, I dropped the black taffeta back down and pinned that to the lining. Basically, you want to smooth the taffeta (or other dress fabric) under the back pleats and pin it down, then smooth towards the side seams and pin down. The point of this is that you're going to stitch down the fabric underneath the back pleats - this will create tension and you'll get that fitted side back look common in the 1760s-70s; earlier gowns (1750s and even earlier with the robe volante) usually weren't stitched down, and you can see that the side back will be loose.
Two tricks - when you pin down under the pleats, you don't want to go further than your pleat-at-the-top repeat goes, otherwise the loose back pleats won't hang nicely. Just pin and then fluff the fabric and see what it does - if it pulls toward the middle, move your pinned/stitched down row a bit more towards the side. The other trick is that when you stitch this down (backstitch again for strength), you want to stop at least 1-2" above the natural waistline. That's because if you pin all the way to the natural waistline, the side back fabric will bunch at the waist (both because of the change of angle, and because of the bulk of your petticoat/hoops at the waist). Stopping about 1-2" up will allow the fabric to skim over this area.
 |  |
After I sewed down the under-the-pleats, I basted the sides of the taffeta to the sides of the linen. I'll cut away the excess linen lining, and some of the taffeta/linen may get cut away too once I figure out where the side seams will be. No need to stitch this down firmly, anyway, as I'll backstitch the front onto the back (once I've draped the front) and that'll secure things.
Here's what it all looks like from the inside once it was all stitched in place:
Thanks for the thoughts on trimming - I'm still mulling it all over. Luckily it'll take enough time to make the gown itself that I have lots of time to decide on trimmings!
posted by démodé 11:52 AM
Wednesday, January 2, 2008
A few months ago I was asked to create a robe à la française for the GBACG costume exhibit at Costume Con 26. Specifically, my dress needs to represent evil, and it needs to be black. Yay, who doesn't want a black française?
Originally I started thinking of a fantasy-esque gown, but those who know me will know that that lasted about 5 seconds... I'm just too historically inclined! It pains me too much to make something fabulous and know that it's not at least my best attempt at period accurate.
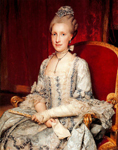
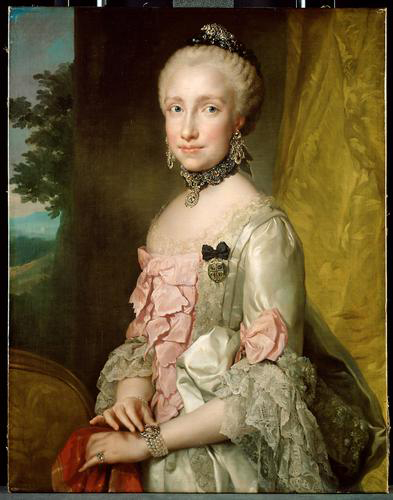
I was saved when I came across a portrait of Maria Walpole, wearing second mourning for her father, by Gainsborough (1764) in Aileen Ribeiro's Dress in Eighteenth-Century Europe. I had always associated mourning with 19th century dress, and was surprised to read that although not quite as rigorous, mourning attire definitely dated to the 18th century... and is very similar to that worn in the 19th century. There was both official court mourning as well as family mourning, and the stages of mourning were set out similarly to those used in the 19th century (all black and severe for the first stage of mourning, adding some white and fashionable details for second mourning, going to lavender and grey for third). Sources that were useful included: Riberio has a few pages discussing mourning costume in the 18th century; the Fritz article is useful for a discussion of court mourning; Barbara Johnson's album includes black fabrics for mourning dresses when family members died.
My main inspiration is the Gainsborough painting, which shows a black silk taffeta française, trimmed with fly fringe for certain on the stomacher and sleeve ruffles (and so probably all over), with white sleeve ruffles and ruffled chemisette-type-thing:
Now as to what I'm going to do exactly, I'm not sure! I do know I'm going to drape and entirely hand sew the française based on the method I used on my peach française, and am going to incorporate the white sleeve ruffles and ruffled chemisette-thing (need to check my sources to see if that's an element of mourning attire or something else? I have seen it on non-mourning gowns as well). The trimming is the big question -- because the dress is black, all I can see is that there is black fly fringe and probably some kind of self-fabric ruche. However, I'm concerned about self-fabric and fly fringe actually showing up if everything is all black. One idea is to use black silk organza for the ruches and then either fly fringe or beading for the trimmings - ideas?
The nice thing about this project is I can thoroughly document it (which I wasn't able to do for the peach dress as much of that was done in the workshop). Since I haven't seen a detailed dress diary for a française (have I missed one?) showing the period construction techniques, I thought I'd get semi-detailed here and take lots of pics.
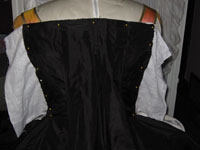
So far, I've worked on the back. I started with a full width (54") of black silk taffeta (you either want to use a full width of 54-60", or two widths of 45") that's long enough to go from the neck into the train, then ripped out small squares about 12"x10" from the top right and left corners (that extra sticking out will create the side pleats in the skirt). Then I pinned the fabric to my dress form at each top corner and at the top center back:
 |
Next, I determined how wide I wanted the center back pleats to be -- 9" total was common in the 1760s-70s (the pleats are generally wider in the 1750s), so I halved that for each side (4.5"), found the center of the back pleats (2.25" from the center back), and pinned the fabric to that point with half of the fullness on either side:
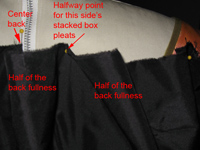 |
Everything in this era is relatively un-picky, so for the back pleats I basically just pleated the fabric so that it was visually aligned into two stacked box pleats (the outer one narrower than the back one) on either side. The one thing to be picky about is to make absolutely certain that the fabric lines up along the top edge -- if you are picky about that, the pleats will fall right (otherwise, they'll go off at wonky angles).
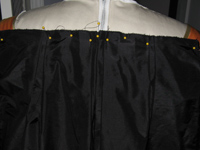 |
The back lining is simply two squares of linen with a center back opening (CB opening is stitched together for the top 3" or so, then folded back into bone casings -- this will have lacing holes, allowing the dress to be adjustable from the inside). I stitched down the taffeta pleats to the linen lining using a backstitch -- one row of stitching all across the top edge of the fabric, and then also about 2.5" vertically on each pleat edge.
 |  |
Next up: more info on the interior back lining, as well as the side back seams.
Let me know if the painstaking detail is useful, or if someone else out there has already done this!
posted by démodé 2:48 PM
|

)
)
)
)
)
)
)
)
)
)
)
)
)
)
)
)
)
)
)
)
)
)
)
)
)
)
)
)
)
)
)
)
)
)
)
)
)
)
)
)
)
)
)
)
)
)
)

)
)
)
)


)
)
)
)
)
)
)
)
)
)
)
)
)
)
)
)
)
)
)
)
)
)
)
)
)
)
)
)
)
)
)
)
)