adjective:old fashioned, out of style, unfashionable [from French, the past participle of démoder "to go out of fashion," from mode "fashion"].

the concept
 |
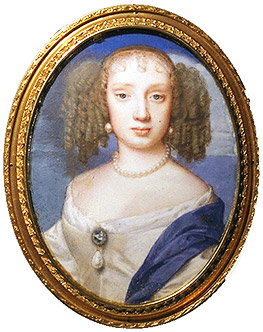
| A c. 1668 gown for Nell Gwyn |
the fabric
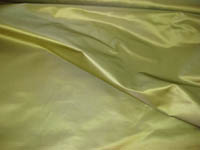 |
 |
| Apple green silk duchesse satin with silver trim |
the pattern
the deadline
| Costume College (Aug. 2009) |
the result
inspirational images:
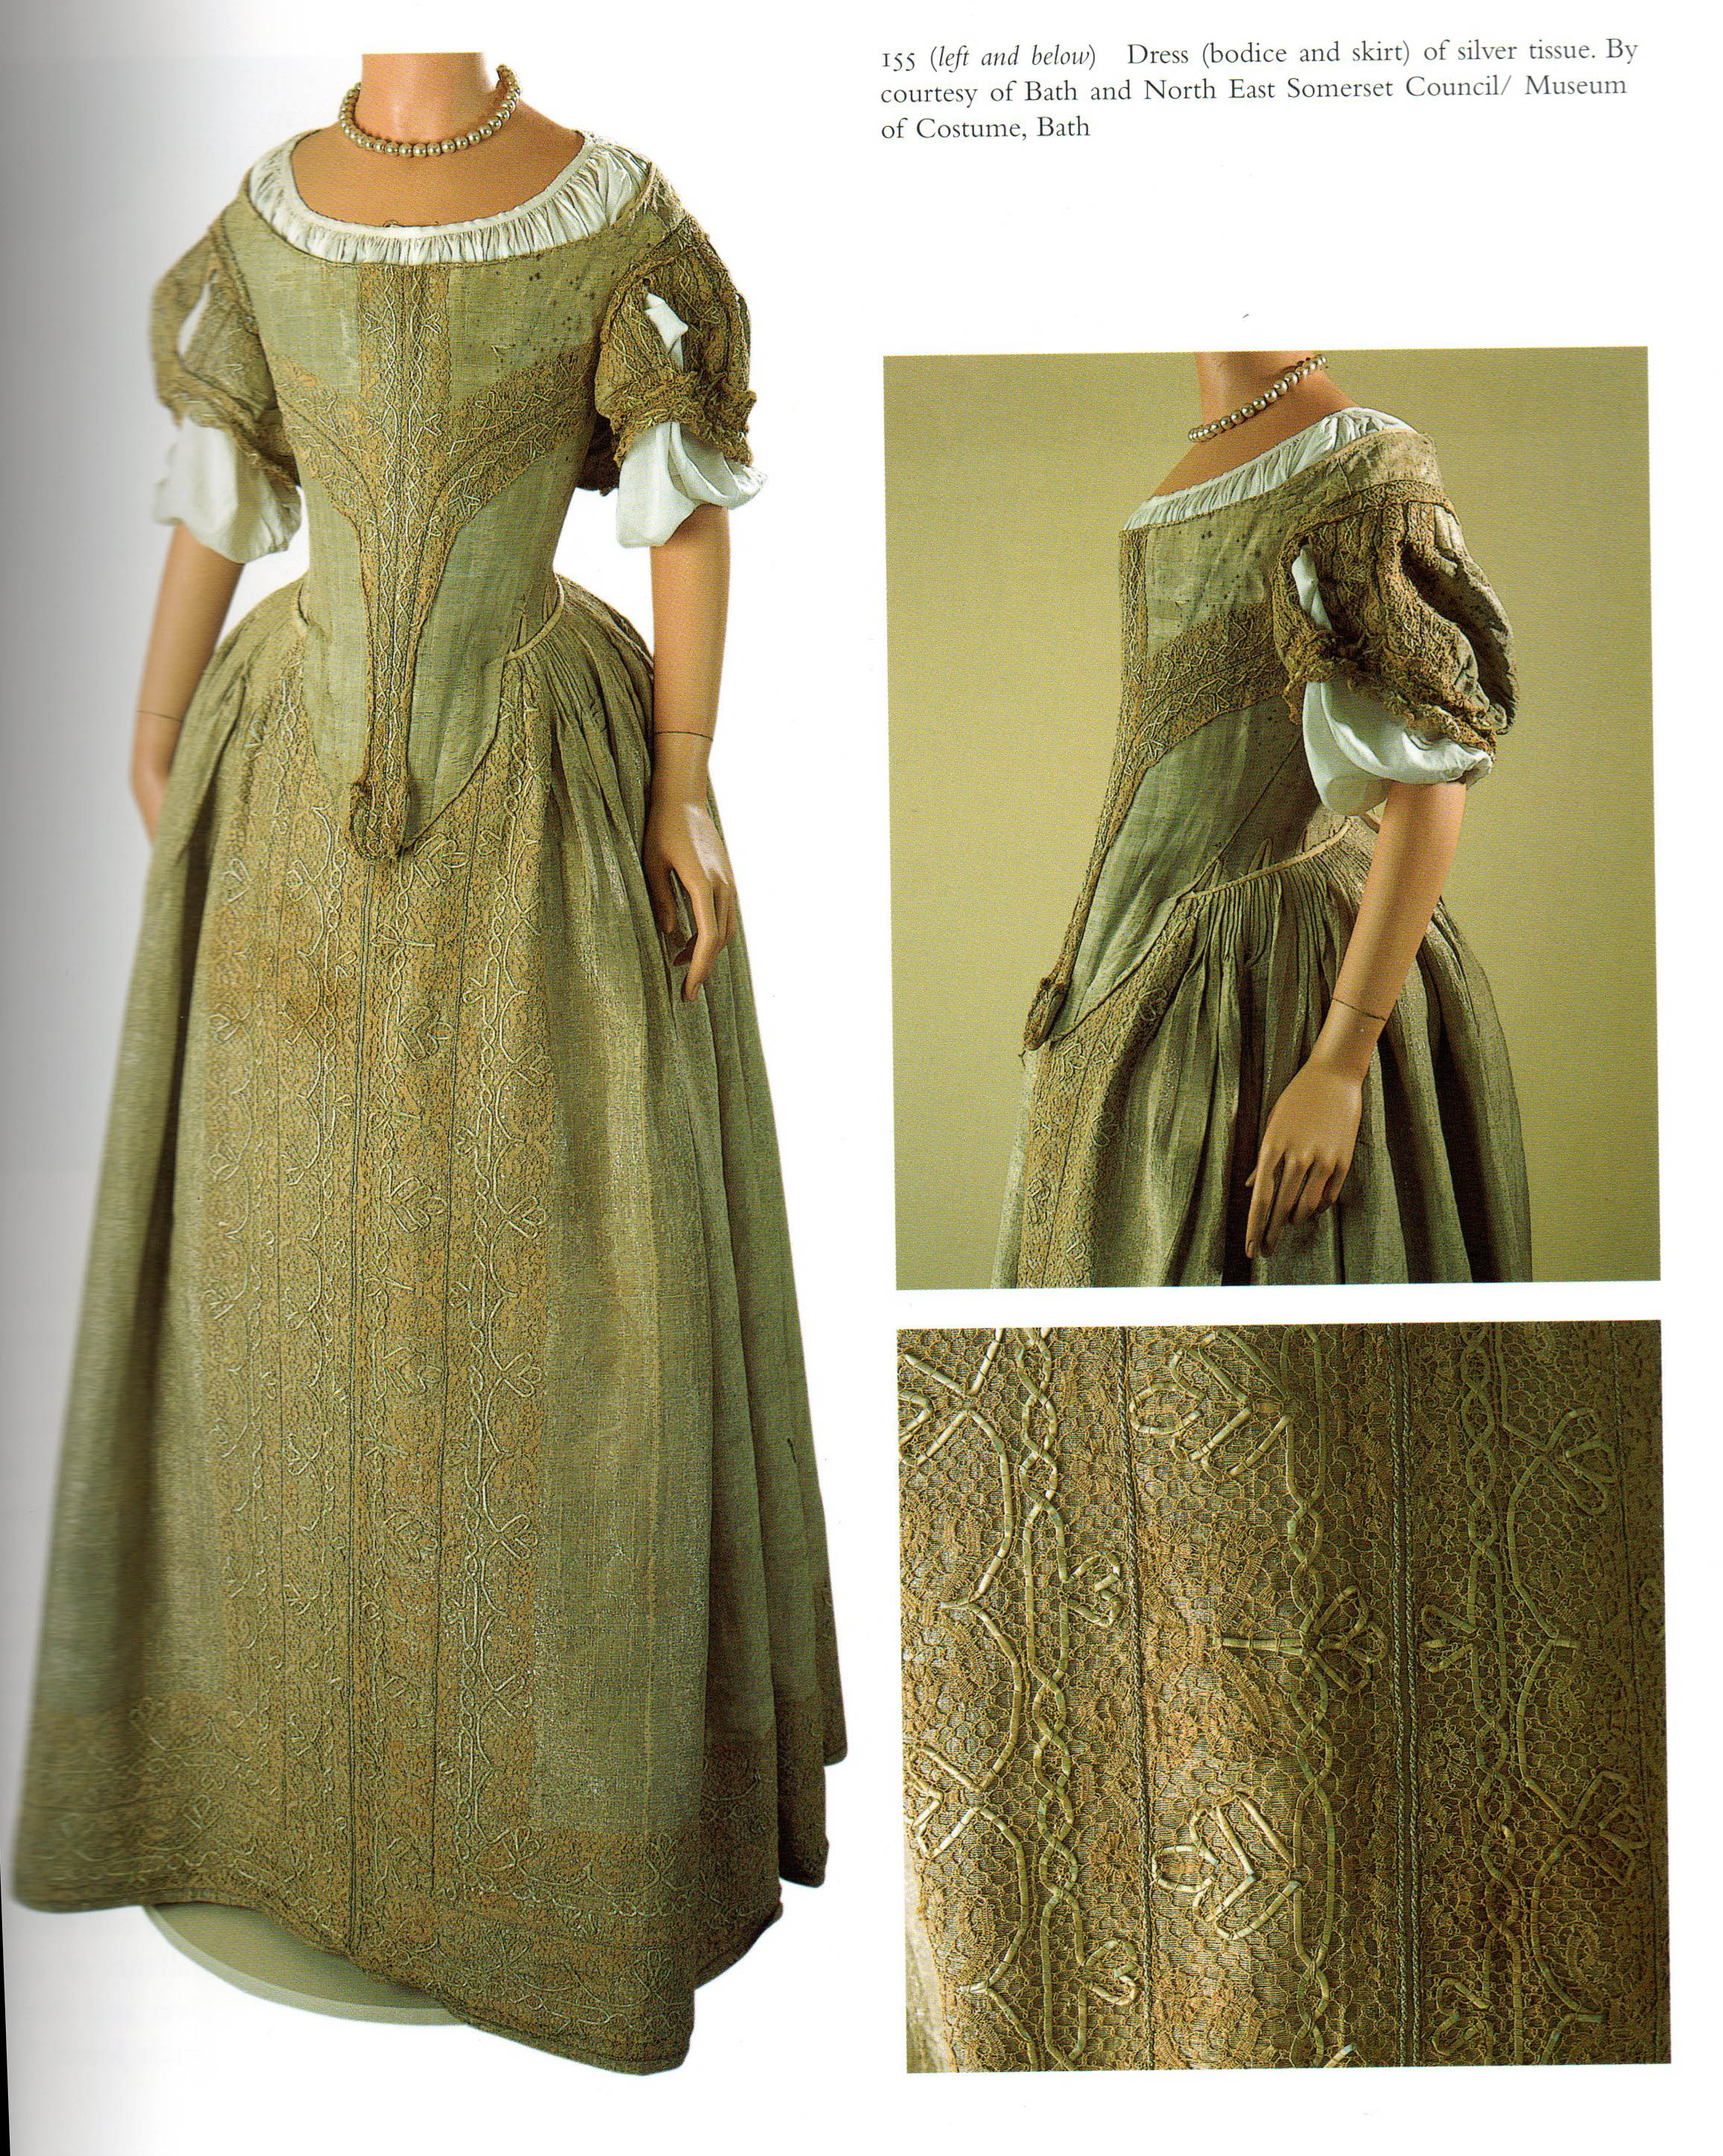
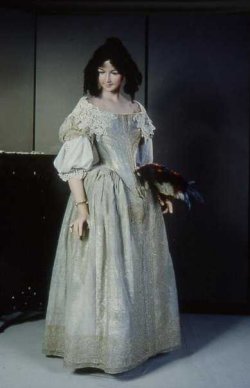
Extant 1660s gown at the Museum of Fashion (Bath)
Anne D'Orleans, Cooper, 1660
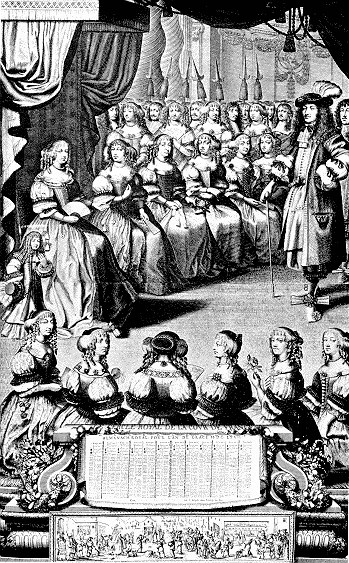
Ball at the French Court, 1660s
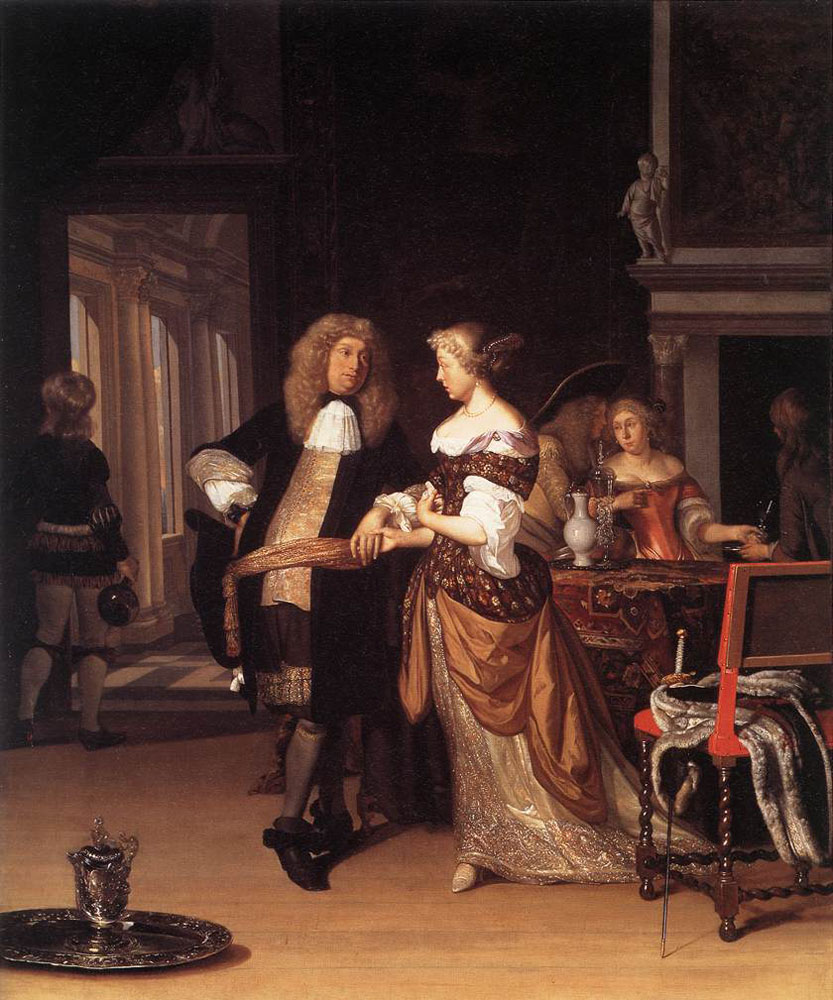
Metsu, 1667
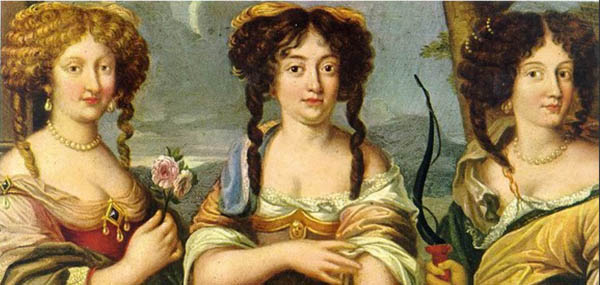
Mancini sisters, 1660s-70s
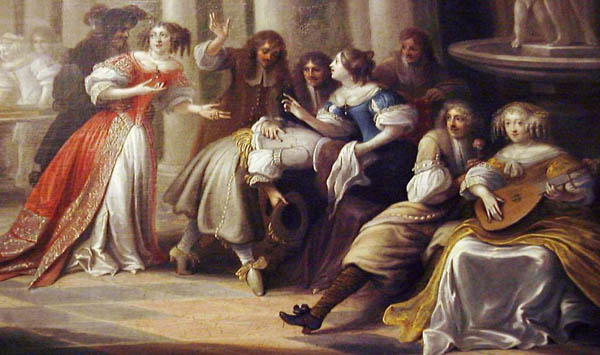
Game of the Warm Hand, Janssens, 1660s
The Tichborne Dole, Van Tilborch, 1671
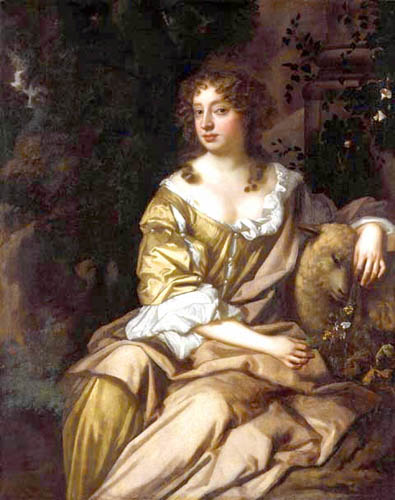
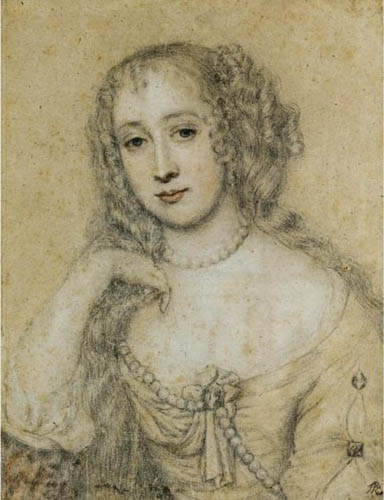
Nell Gwyn, Peter Lely, 1675
Nell Gwyn, Peter Lely
useful links
Charles II community (LiveJournal)
Nell Gwyn (Wikipedia)
bibliography
Arnold, Janet. Patterns of Fashion: The Cut and Construction of Clothes for Men and Women, 1660-1860.
Hart, Avril & Susan North. Historical fashion in detail : the 17th and 18th centuries.
Hunnisett, Jean. Period costume for stage & screen. Patterns for women's dress, 1500-1800.
Riberio, Aileen. Fashion and fiction : dress in art and literature in Stuart England.
|

Friday, August 7, 2009
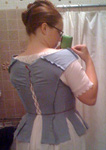
I'm very very, if only 99%, pleased with how this turned out!
Side note: I was asked what the hell was the difference in the two sleeves, so just to clarify: the shoulder wing didn't come all the way forward to the sleeve split, and the sleeve was hanging weird right at the bottom of the cartridge pleated portion. I know, I know!
So the skirt! It's about 150" wide (Hunnisett recommends around 140" for this era; I'm tall, plus my fabric was around 50-55" wide -- so 3 panels). I peered and peered at the Bath dress (yes, that is the theme of this dress), and what I think is going on is that those are cartridge pleats (you can see the lower threads holding the pleats in place) that are then pushed to one side and bound. I think. Not being 100% sure, and reading over and over about bound cartridge pleats, I had to figure out what to do.
I finally ended up doing standard cartridge pleats about 2" deep (the Bath dress looks at least that deep, if not deeper), and then just binding the very TOP of the gathered up pleats. In other words, I cut a narrow strip of fabric, sewed one folded back edge to the top of the cartridge pleats, then flipped that over so that it laid on TOP of the flat portion of the pleats (the part that lays against your waist). Then I folded the other edge under and sewed it to the BOTTOM of the gathered up pleats. Here's a not terribly clear picture -- hope you can squint at it and make sense of it all. It looks a little looser here than it really is, as it's not on me/has no tension... plus I had to fudge a little bit when I transitioned from the flat CF to the pleated portion, which you can see. 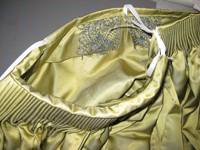 |
I was pleased that this worked very well, and the pleats did stand out as they should (and the bound edge did lay against my waist).
I had originally considered wearing it over my quilted petticoat, but looking at lots of paintings convinced me that the skirts weren't THAT wide in this era. So I wore it over my bumroll (Ribeiro presents evidence that they were worn) and my roped petticoat (to avoid too thin a skirt/too much leg action).
I used the two series of ties that are again seen on the Bath dress, which is a really brilliant idea... except that I forgot to tie the first ties before putting on my bodice, and I also forgot to align where I sewed those to the skirt with the tab splits. So I ended up with the ribbon outside of the bodice for a few inches before I could tuck it under... but luckily I don't think it showed!
Everything turned out swimmingly when I wore it, except that we couldn't get it to lace 100% closed. Which peeved me a bit, but I was happy to see both Katherine/koshka and Katherine/seekatesew had the exact same problem. Safety in numbers! As they didn't do plackets in this era, neither did I, so you got to see my chemise (scandal!) in all it's glory. One of my favorite moments was when Jenn came up to me at the gala and said, "I'm dying to get medieval on your ass and get that bodice to close." And we probably could have by that point, as things had settled/stretched... but by that point I didn't care anymore! I did faithfully take a clear picture of the back, for full disclosure.
And the hair? ROCKED. It was so much fun to dance in, even if the clips did hurt my ears after a while. Who cares!
Overall, I'm really happy with this -- it's actually my first really boned bodice, and my first time really working with silk duchesse satin, and the combination of those two could have been disastrous -- but aside from some VERY slight waist wrinkles, all went well! And I'm thrilled to have finally done this era... now I just want a chance to be Nell, so I need to get back on to planning the event for this!
posted by démodé 12:26 PM
Monday, July 27, 2009
The dress is done, although I'll limit myself to talking about the sleeves -- will post about the skirt and chemise when I get back from College.
Luckily, I'd done all that mockup work a few months back, so there wasn't much left to do. The big questions for me were - how to make the shoulder wing work, and how to pleat and finish the sleeve. For the shoulder wing, I first tried the shape in Waugh & Arnold (which has a "crook" in it) -- but it folded weird and I ditched it in favor of just cutting the thing on the bias, which worked perfectly. It's two pieces, sewn together then flipped inside out. My theory is that if it's not purely decorative, the wing could serve to hide the attachment of the cartridge pleated portion of the sleeve. I put a lot of thought into pleating the sleeve -- if you look at the Bath dress, it's put together like cartridge pleats but the width that shows on the outside ("between" the pleats) is very wide... and I just couldn't get that effect. I'm thinking that the silver tissue the dress is made of must be very stiff? Because it doesn't look like there's a backstitch or anything else holding the pleats apart. This will only mean something to you if you've peered at that dress as much as I have, of course!
So I put together the wings, then one sleeve and checked things -- when I realized that I'd mismeasured the wing, measuring from the strap seam instead of where the sleeve slash is (which is further forward). Plus, I didn't totally love how the sleeve was looking at the bottom back.
I thought strongly about just leaving it, given the time crunch and the # of other things I had to do... but then got more caffeine, ripped things off, and remade the wings and fixed the bottom pleats.
I was super proud to have the whole thing done, including the skirt and chemise, by 2:30am on Saturday night -- I was thinking I'd have Sunday to noodle on the last few things I needed to do for College! But of course I ended up with far more to do than I'd expected, so I collapsed on the couch last night around 7pm with still a huge (mental) to-do list... Gotta get organized! See you all on the flip side!
posted by démodé 12:44 PM
Monday, July 20, 2009
Bodice finishing: a tragedy in pictures (with, hopefully, a slightly redeemed ending?):
Our heroine finished the binding, doing ALL of the bottom edge by hand (and the top by machine on one side). See her fingers hurt! Look how pretty! But wait - she discovers a crisis in her flatlining over the bust, above-the-boning! "Why is it so wrinkly and horrible?" she cries, relieved that at least the back looks okay!
Our heroine discovers that the bodice wrinkling seems to be because the flat lining got messed up (the flannel layer is wrinkled) above the boning, and because the fashion fabric layer is slightly bigger than the foundation layer at the side seam. She opens up the side seam, trims the front piece a bit, smoothes and pins - fixed? Yes! There's still a tiny wrinkle, but that's because there's nothing behind the bodice right at that point (between the bust and shoulder).
To ensure that this doesn't happen again (naughty wrinkling), our heroine gets in there with her spray basting to get everything properly aligned before she sews it down. And hey, she is happy because now it will look like she sewed the seam like a proper 17th/18th c. bodice seam is supposed to be sewn (overlapping one side and top stitching)!
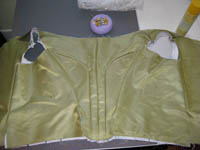
But wait! AGH! While spray basting, our heroine has a freak spray basting accident, where she accidentally sprays the adhesive on the fashion fabric in a concentrated burst. Crisis! She has a giant stain!
Our heroine decides she has three options - 1) remove the binding and replace the side piece (OMG SO MUCH WORK), 2) try various stain-removing techniques (which quite possibly won't work or will make it worse), or 3) cover it with trim. After deep reflection and a liberal application of chocolate, #3 wins! So she experiment with possible trim layouts to cover the stain:
She decides that the left-hand option looks like the most period trim aesthetic, although she can't find documentation for either layout. She sighs, wishing for her fairy godmother to appear to fix it -- but realizes that she is a modern woman, with no fairy godmother, so gets to work.
 |
posted by démodé 11:13 AM
Tuesday, July 14, 2009
I only had one day to sew last weekend, so not too much got done. I finally put the fashion fabric/flannel onto the boned foundation, sewing around all the edges to stabilize. I'm now working on binding the bottom edge, which I'm doing by hand, so it's slow going (I just know if I do it on the machine I'll screw it up). One thing I'm wondering about is the slashed tabs -- I didn't machine stitch around them before hand sewing on the binding. Is there something I can do to stabilize them so they don't rip? I have fraychecked, and I'm stitching on the binding with a backstitch... hmm!
I haven't yet stitched down around the armhole, which is what I think is causing those side back wrinkles...
posted by démodé 11:22 AM
Thursday, July 9, 2009
Can you handle the cuteness? Of course you can!
So those who know me know that while making and wearing the garments are a huge part of my love of costume, I also REALLY love figuring out the hair & makeup and completing the period look. One of the things that REALLY makes my toes curl when it comes to the 1660s-70s are the hairstyles.
The 1640s-50s are okay - pretty, but kind of demure. The 1670s are HILARIOUS - love the ubiquitous one curl hanging down. But it's the 1660s that just make me very, very happy.
Most of the styles include the hair pulled back or parted on top, and huge masses of curls at the sides (which were wired to stand out - some have just a few ringlets hanging down, others many). There aren't many side or back shots (of French/English women - and the Dutch women seem to wear older/more restrained hairstyles), but the few I've found show that they're still wearing buns on the back of the head.
But honestly, I LOVES me this RIDICULOUSLY SILLY hairstyle worn by Henrietta Anne d'Orleans (Charles II's sister, who married the brother of Louis XIV)... and I knew exactly how to achieve it. So I was very happy (and apparently, so was Winston, who my husband insisted needed to be in the picture) yesterday when my hairpieces arrived! They're those jawclip pieces, and while normally I would insist on removing the jawclips, they work perfectly for creating the hugeness of the side curls (okay, I need to wear them about 2-3" lower. And redye my hair). Yay! (And yes, I look like death - still recovering from the flu. But I have ridiculous hair, which makes me happy!).
 |  |
posted by démodé 2:50 PM
Wednesday, July 8, 2009
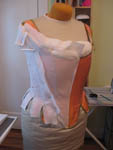
Thank goodness for 3 day weekends! I went ahead and recut the foundation layer from coutil, took it in about 1/2" at the CF, and remade the whole thing -- and it's looking fabulous now. I still can't get it quite laced shut, but that's an issue of lacing myself in. Of course, I still have a 1" seam allowance on the top & bottom edges that I won't cut off until I'm ready to bind, so that will tidy things up a bit too.
Then I patterned and cut out the fashion fabric layer, along with its cotton flannel interlining (which I'm hoping will hide any bumps that would otherwise show through the not-very-forgiving-satin, and put those together. Besides my wedding dress, this is really my first time working with silk duchesse satin, so it was an experience pressing the seams (with the whole stick-heavy-paper-into-the-seam-allowance thang):
 |
All that took me THREE DAYS (okay, minus all the various social activities I did last weekend), which is again why I think I'm in the running for world's slowest sewer.
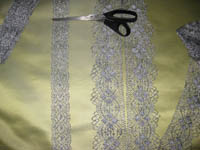
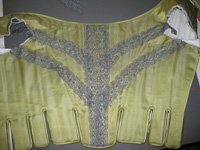
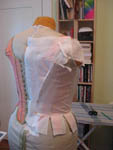
Now I have the flu and can't do much except lay on the couch and feel sorry for myself, so I've been working on trimming the bodice. I decided to sew on the silver lace first, before mounting the fashion fabric layer. I ended up adding some trim in back along the lines of the Bath dress -- haven't decided yet if I'll do the CB, possibly not? I do have a decent amount of the silver lace left -- I will obviously do the sleeve opening, maybe also the random shoulder wing? And potentially around the cuff of the sleeve? Not sure, it's all a work in progress.
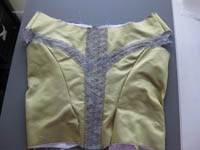 |  |
I still need a few more pieces of boning (lengths changed as I tweaked my pattern), so until I can get those I can't mount the bodice on the foundation layer - so next it's sleeves. I'm trying to figure out how to finish the edges of the sleeves, since they're cartridge pleated -- it LOOKS like the Bath dress is sewn with the raw edges abutting the armscye (am I hallucinating? see here and here. Maybe the random shoulder wing is to cover something here? Also, I discovered in looking at Cathy's photos that while Waugh patterns the armscye differently for the foundation layer and the fashion fabric, they're actually cut the same -- it's just that the sleeve is put on not matching the armscye in back. And I've cut my fashion fabric with that larger armscye. Oh well, I shall fray check things and then hand sew the sleeve on through all the layers (after I've mounted the bodice), working around any boning.
posted by démodé 10:01 AM
Thursday, July 2, 2009
Taking that sewing break was great, because I'm back and fired up about this costume. However, in light of my desire to get in touch with my own costuming motivations and costume for me, I've decided to change a few things -- like ditching the reed boning. I really do want to experiment with it soon, but this is not the project (due to time constraints). This project I want to be pretty and done on time -- and while I'm still interested in making certain elements of the construction authentic, others may not be.
With all that being said, I got together with Jenn last weekend for a bodice fitting. Man, does that girl know her stuff when it comes to corsetry! She helped me create a gorgeous bodice mockup and gave me tons of construction advice. I tried using the boning layout from the Bath 1660's silver tissue dress (in Norah Waugh), but we found that we got a much prettier silhouette on me using an angled boning pattern more in keeping with the (I think?) 1680s corset in Corsets & Crinolines. One thing that did work really well was stopping the boning about 2" from the top edge in front -- it allowed the high neckline to work, in that it didn't stick up past my bust point (note to self: remember this technique whenever you make a Tudor dress!).
So I went home and worked on my foundation layer, which I'm making (?) in a heavy linen I picked up last year in the garment district. I cut it out, sewed all the boning channels, sewed the piece together, and made enough eyelets to be able to put it on... and we've got some problems: it's too big, and I'm having problems lacing it closed. I think my pattern pieces may have grown by about 1/8" on the sides when I cut it out (no problem, I can easily take it in). But I'm worried that part of the problem is the linen is stretching - have others had that experience? So part of me is wondering if I should ditch this version and make the foundation out of coutil (because hey, if I'm using metal boning, so what if I'm not using linen for the foundation? Of course, I'd rather not redo all that work if I don't have to).
Another issue is that I can't get it to lace closed all the way -- when I look at the patterns in Arnold and Waugh, it looks like at the CB there's a layer of boning, then the lacing holes are right up against the CB edge without another layer of boning to support it. (The reason for this being that the fashion fabric is sewn down just to the inside of the lacing holes, then lays on top to hide the lacing holes). Of course, when I look at a closeup picture of the center back of the Bath silver tissue dress (mad props to Cathy Hay for getting in to see this dress and taking great pics), it looks to me like there may be whalebone in the CB (could the lacing holes go through the whalebone? I don't know whether that's possible, not ever having touched whalebone). So I'm wondering whether to repattern the CB so that there's eyelets and then a 1/4" bone along the CB edge to support the lacing. Because I've never had this problem lacing shut a bodice before... oh, and the linen is stretching where the eyelets are, and the CB edge is already wavy from this. Then the question is -- make the eyelets go thru the fashion fabric? Because contrary to what I'm seeing on the Arnold & Waugh patterns (and of course, possibly when I look at those patterns I'm insane!), obviously you can see the lacing holes in the Bath silver tissue dress.
So what do you think -- replace the linen with coutil? Bone the CB edge (and if so, lacing holes through the fashion fabric)?
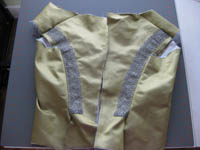
Unfortunately I've found the camera but no memory card, so crappy iPhone pics will have to suffice -- here's where we are at: too big, can't lace shut, but trust me, when I fix those issues it's going to be really pretty!
 |  |
posted by démodé 10:32 AM
Monday, January 26, 2009
I have been busily working on mocking up the various elements of this (mockups = don't have to cut into expensive silk satin! terrifying!).
First up was the bodice. Although I've hemmed and hawed, I've decided to make a boned bodice as was done in this period, rather than a bodice over a corset (they did have corsets in the 17th c., but it appears they were worn earlier/later or for undress).
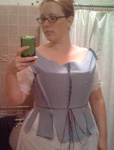
Since I want the torso silhouette to be somewhat similar, I put my 18th c. corset on my dressform as a base. I referred heavily to the 1660s silver tissue dress pattern in Norah Waugh, as that shows the pattern of both the boned underlayer and the outer fabric (which were patterned differently, weirdly enough) -- Arnold's pattern is only for the outer (fashion fabric) layer. The draping process was very straightforward, although I think I may need to tweak the bodice front V a bit still. The main change silhouette-wise was that I took in the mockup a bit over the stomach to create the curved front seam, which you can't really see in the pictures as it's going to be tighter in the midsection than my 18th c. corset.
 |  |
I was REALLY excited to find that my Uniquely You did a good job at approximating off-the-shoulder shoulders. For ease in fitting myself, I made the mockup front-opening although the real deal will open in the back.
So here's a mockup JUST of the boned underlayer -- the outer fashion fabric will have some tweaks, following Waugh's pattern (namely, the armhole is bigger and the front bodice pieces have a curved princess-esque seam):
Then I drafted out all the boning (again, as based on Waugh's layout) and ordered steel bones (still haven't decided on the cane/reed vs. steel question - agh! I believe you all that cane/reed is somehow better, but then I've got the steel on the way) and coutil.
While I wait for that to show up, I started mocking up the sleeve. I drafted the sleeve pattern from the 1660s bodice in Janet Arnold (Arnold is easier to size up, as her patterns are all helpfully gridded). Here it is, straight from the book without being resized for me:
Looks great - yay! What I'm not sure about is how much to add to the pattern to make it suit me. I know I'm bigger than the original pattern's wearer, but by how much I'm not sure. In this mockup I just gathered up the sleeve top; I need to double check exactly how much of the sleeve is cartridge pleated (and how tightly), then cartridge pleat the mockup to figure out how much more fabric I need to fit my armhole. I tried to compare sizes with Hunnisett's pattern, but for the life of me I couldn't find what size her patterns are drafted to (ugh! anyone know? I'm sure it's in another one of her books... she has a weird tendency to omit stuff like that haphazardly).
posted by démodé 11:32 AM
Friday, January 23, 2009
So I draped the bodice pattern and made a mockup, but my photo card reader went missing so no photos so far! But card reader has been found, so photos this weekend.
I am mulling over LOTS of construction questions:
1) Boning - spring steel or reed/cane/whatever? I've never actually used the latter, and while when I posted about this to my LJ costuming friends they all overwhelmingly said "yay reed/cane!" I am still wondering. Will the roundness of the reed/cane show through, since this is essentially a corset & bodice in one? Especially since the covering fabric is satin, which as we know shows every bump, wrinkle & flaw. I did order spring steel boning and am waiting for it to arrive, so I do have that option... There's part of me that wants to get all nutty and super-period about this dress, but another that's saying "Just use whatever will look good, work, and give the right effect."
2) I can't wrap my brain around lacing skirts to bodices (through slits in the bodice tabs). Can anyone explain how this concept would work? Where are the laces sewn in the skirt?
3) I REALLY can't wrap my brain around the skirt waistband/top finishing. According to Waugh, dresses were either knife or cartridge pleated, and top was either bound or attached to a waistband. According to Waugh, the Bath gown is cartridge pleated and bound at the top; as you can see from the image, it's worn over the bodice tabs everyone except at the CF. So how the hell do you bind cartridge pleats? Sarah linked me to a helpful post about stroked gathers, but my brain isn't gakking it. Or if you had a waistband, where would the waistband go? You wouldn't want a waistband showing on TOP of the bodice.
*Mulls, scratches head, hopes some of you can shed light*
posted by démodé 3:38 PM
Tuesday, January 13, 2009
Introducing my other major project for this year -- a c. 1668 gown for Nell Gwyn, or, What Would Nell Gwyn Wear? Sit down, this is a long post!
I tend to get really evil ideas. Last year it took a while to come down off the immense stress of pulling off the Eugenie project for Costume Con, and I vowed never again would I undertake a costuming project with that many people.
Cut to a few months later, right before Costume College, I was reading a historical fiction book about Nell Gwyn (The King's Favorite, which I highly recommend btw if you're into that sort of thing). As readers of this site will know, I adore making and wearing costumes, but I equally adore having the chance to put on a historical persona, to both be someone else but also to experience history in that way.
So there I am, riding the BART train home from work, and suddenly a horrible, Grinchy idea pops into my head - what about doing a costuming project that involves recreating the mistresses of Charles II? Oh god no, I thought, not again. But the idea stuck, and I realized that if it WASN'T for any sort of competition (meaning everyone has to be done on time and to the same quality level etc.), it could be fun. And there were a LOT of mistresses (Chuck being prolific that way), so a lot of people could join; including people of the court beyond the mistresses would allow anyone to join, and it would be fun to have a group project that was welcoming to everyone! Plus I've always wanted to make a costume from this era, but never had an excuse... and I knew it would need to be made from duchesse silk satin, which would cost an arm and a leg.
And then it was downhill from there -- Sarah loved it, Trystan was talked into it when she found out she could be Aphra Behn, and everyone else I talked to at Costume College was in. Since then, there's been lots of plotting on our LiveJournal community.
Of course, it was my idea, so I got to pick my character first. As I read the book mentioned above, I loved Nell Gwyn's personality; I loved that she was an actress who rose from the proverbial gutter to the king's bedroom; I loved that she was a redhead. Okay, yes she was also like 5' tall, which is a bit laughable on me, but I figured a bit of artistic license would be okay.
Now, on to what I'm going to make! One of the biggest wrinkles with this period is that there aren't a lot of portraits painted in England in the 1660s-70s that show women in real dress (as in the kind of dress they'd walk around in); most show women in various semi-mythological drapery. So most everyone would need to research their person and create a dress that that person might have worn. While there are portraits of Nell, they are VERY drapery/posing gown.
I struggled a bit with the exact era -- all the costumes in the project are supposed to be from the reign of Charles II (1660-85); I've always adored the silhouette and hairstyles of the 1660s, but the 1670s were tempting too, particularly the perhaps even sillier hairstyles -- but I realized that I didn't like the narrower silhouette of that era so much.
Nell's acting career really took off in 1666, and she hooked up with Charles in 1668; by 1671 she had retired from the stage. I was most drawn to her stage years, but still want to be a mistress, so am aiming for 1668 (in other words, late 1660s) for this costume. Unlike many of the costumes I make, there's no one specific costume I'm trying to recreate; instead, this will pull together the elements of late 1660s costume that I love. Here's a collage of images that are particularly inspiring me:
I have posted a sketch of my concept, as well as what will be the real linchpin of this costume: the fabric and trim. One of the things I adore about this era is that it's all about excellent tailoring of simple yet elegant materials (not that I don't also have a soft spot for trim on trim a la the 1870s); while fabrics like taffeta were used, the majority of dresses are in silk duchesse satin and I always knew that's what I needed for this project.
So I finally did it bought 8 yards of silk duchesse from C&J Textiles in New York in apple green. The color was inspired by the few green 1600s dresses I've seen (hey, I'm a redhead) and, I will admit, a dress worn by Nell Gwyn in "The Last King" (miniseries starring Rufus Sewall). To trim, I found some wide silver laces at MJ Trim (the wider lace will be the skirt center front, while the narrower will be on the dress and sleeves). I thought about doing one of the gowns with the split overskirt, but at the price of this fabric and trim, there's no way I could afford it -- so a single skirt it will be.
I'm still doing lots of research on undergarments and construction, so lots more plotting is to come... I'm off to sit down with Janet Arnold and Norah Waugh for some more research!
posted by démodé 7:31 PM
|

)
)
)
)
)
)
)
)
)
)
)
)
)
)
)
)
)
)
)
)
)
)
)
)
)
)
)
)
)
)
)
)
)
)
)
)
)
)
)
)
)
)
)
)
)
)
)
)
)
)
)
)
)
)
)