démodé
adjective:old fashioned, out of style, unfashionable [from French, the past participle of démoder "to go out of fashion," from mode "fashion"].
the concept
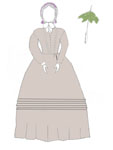 |
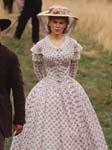
| Meg March's 1864ish summer dress, bonnet, & parasol |
the fabric
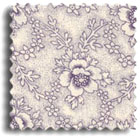 |
| sheer lavender cotton lawn |
the pattern
the deadline
the result
what's on the dvd player?
 |
| Little Women |
useful links
Dressed for the War: Women's Day Wear, 1861-1865
Victorian & Edwardian Photographs
bibliography
Bradfield, Nancy. Costume in Detail, 1730-1930. New York: Costume & Fashion Press, 2000.
Hunnisett, Jean. Period Costume for Stage and Screen: Patterns for Women's Dress, 1800-1909. Studio City, NY: Players
Press, 1991.
|
Saturday, June 16, 2007
Final photos!
posted by démodé 5:30 PM
Wednesday, May 16, 2007
I'm here! I exist! I have sleeves -- but they're not what I want.
Life has been crazy lately -- blah blah, same old story. I have been sewing when possible, but a total lagger about updates. The event I'm going to wear this at is this Sunday, so I knew I'd better put some sleeves on this sucker....
As I posted before, I ran out of fabric for sleeves. I optimistically ordered a few more yards, and was completely freaked out to hear about a week later that they were sold out of my fabric. And the fabric is a line from a few years ago, so it's not like I could find it elsewhere! The store was very nice on the phone, said they would check their remnant bin and even contact the person they had sold the rest of the fabric to. Of course, they didn't find any remnants and the person they thought had bought my fabric actually bought another. I'm pretty grumpy that they still had the fabric listed as available on their site... but lesson learned (and I thought I had already learned it!): always buy more than enough fabric!!!!
So my options (after throwing a few hissy fits) were to trash the dress and start over (too poor, too little time); cut off the bodice and make this into a skirt and blouse outfit (too little time, not excited about that option); or go with what seems to have been a relatively rare, but still period, option -- sheer sleeves with a little cap and cuffs from the dress fabric:
 |
I didn't like any of those options, but the sheer sleeves was the least additional work so it's what I went with. Luckily I found some scraps of my fabric in the bottom of my sewing room trash bin, so I fished those out and managed to eke out a small cap and cuffs. The sleeves themselves I made using that Simplicity pattern I had already mocked up out of some cream silk organza in my stash.
So here you are! I'm not happy about it, but it means I have a dress to wear. Grumble grump grumble.
Now I need to add closures and this is done. I doubt I'm going to get to the parasol -- I'd love to have it, but I'd really have to bang it out fast as I leave next week for a 3 week trip to France and England (yay!) -- which means I really only have Saturday to organize my life and Wednesday to pack. So we'll see, but I doubt it.
posted by démodé 10:42 AM
Monday, April 23, 2007
I really do think I may be the world's slowest sewer (okay, Trystan, I'll wrestle you for it!) but after reading that Sarah made most of a Venetian AND started an anglaise ALL THIS PAST WEEKEND, I figured I'd better get off my butt and get this bonnet trimmed. (I think we may need to add an S to WWKD).
I was particularly inspired by this 1850s photograph as well as some others in My Likeness Taken. I love the full lace inside the brim, and I liked the photo for having the trimmings on the side rather than at the top of the bonnet as is often done.
I got some vintage cherries on ebay that are really pretty; I was all set to head over to Lacis to buy some kind of flower to put with it, but they are closed on Sundays! What's up with that? It's okay, because it made me save some $$ and figure something out from my stash. So I added some homemade ribbon flowers (out of a two color purple ribbon I had) as well as some green and burgundy velvet leaves. I varied the groupings on each side (one side has 3 ribbon roses, the other 2; one side has burgundy & green leaves, the other just green) so it wouldn't be TOO symmetrical (too symmetrical is like too matchy for me -- looks too "costumey"). And I added the way too expensive vintage ribbon that I bought last year at Costume College (which is the centerpiece for this whole outfit!).
Finally, I remade the bavolet -- as I mentioned in my last post, I didn't like my first attempt. I looked through my image files and found this 1840s bonnet which was really pretty, although I decided to keep the pinked scallops from my first attempt.
So voila! Pretty pathetic for one weekend's work, but at least that's done. Now the parasol (which I am DETERMINED to do by the end of the day Saturday so I can get started on some other projects).
Oh, and STILL no word on my fabric crisis, but Bridget has saved the day by finding an 1860s fashion plate which shows a summer day dress with long sheer white sleeves with a cap in the dress fabric. So that'll be my backup. Phew!
posted by démodé 12:51 PM
Saturday, April 21, 2007
This has been such a crazy week that although I worked a lot on the bonnet last weekend, it's taken me this long to post about it! Crikey!
First up, I made the lining. I'm broke enough that this had to come out of the stash, so it's a coordinating darker purple cotton broadcloth. I sewed the tip to the bonnet sides, then stuck that inside the bonnet -- cut a flat piece of the silk for the brim, and then sewed both that and the lining down where the sides connect to the brim.
I had originally thought I wouldn't worry about sewing down the fabric at the bonnet opening edge, as that part will be covered. But then I realized I had all this extra overlap on both top and bottom, and I knew it would get squidgy when I went to cover it. So I folded the edges in and hand stitched them down -- there wasn't quite enough fabric to do so at the very top of the bonnet:
Finally, again copying Lynne's reproduction, I made a gathered strip to cover the bonnet edge. The strip is doubled, folded over to form a casing, and gathered on a wire; sewn down along the gathers on the outside, with the inside just falling into messy pleats which are sewn down periodically.
Last step -- making the bavolet, which is the ruffled bit at the bottom of the bonnet. Lynne's is gorgeous, but I don't want to copy her bonnet TOO closely! I originally thought I'd do a scalloped/pinked edge, so tried this -- but I don't like it. The folded over scalloped edge doesn't work, and I think I need to graduate the width so that it's even all the way around (right now it's all the same width).
Then it's trimming!
Still no word on my sleeve-fabric-crisis (store is sold out) -- still hoping! Otherwise, it's making some kind of sheer sleeve (which is really an evening thing), cutting off the bodice and making a blouse (lame), or starting over (makes me want to cry).
posted by démodé 2:04 PM
Monday, April 09, 2007
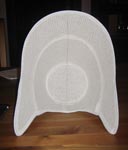
While I wait for my sleeve fabric to arrive, it's time to work on the bonnet! The whole point of this outfit (well, beyond wanting a sheer dress) is the bonnet -- specifically the bonnet ribbon that I paid way too much for at Costume College last year.
I knew I wanted a drawn bonnet as that is a specifically warm weather style (and far more interesting than straw!). Luckily I am friends with the world's most talented milliner, Lynne Taylor(who teaches workshops for GBACG); at the Little Women costume salon, she brought her reproduction drawn bonnet to show me how they were made, and even lent her's to me to use for a reference! The one she copied was a spoon bonnet, which has a buckram base for the crown and tip and a wire frame for the brim.
Luckily for me, my work was half done as about a year ago I took a workshop from Lynne through the GBACG in which we made bonnets! And even more luckily, I was lazy after that workshop and never finished my bonnet (I'd assembled the buckrame base but had yet to attach the brim or to do any covering). Yay for laziness! The style I worked on in the class is a close bonnet (1850s/early 1860s), which is a style I really like -- I briefly debated trying to make a spoon bonnet, but I don't like the style as much.
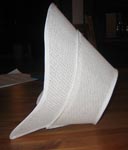
So I started by trying to reproduce Lynne's reproduction by making the brim out of wire. Okay, that was HARD! I fiddled and fiddled and then realized it would be far easier, even if not period, just to use my buckram brim -- no one was going to see the inside of this bonnet! So I attached the brim and my base was complete:
 |  |
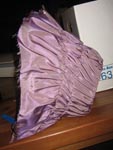
What I did want to achieve for sure was the look of Lynne's bonnet, and it was soooo helpful to have it in front of me to study. The tip (the flat back) was covered with a smooth piece of taffeta - easy to do. The piece covering the outside crown and brim was harder -- it was gathered on a ring of millinery wire just over the edge onto the tip. I basically had to drape the pattern, which was hard as I wasn't entirely sure how much gathering to go for and what shape I should be aiming for! But I never let not being sure stop me before, so I winged it and ended up with something relatively decent:
Next, Lynne's bonnet had a row of gathering stitches about where the brim attaches. Most drawn bonnets are "drawn" because they are gathered up on wires/canes (like this one), but Lynne's was just done with gathering stitches. Yay! Makes it even easier to deal with my buckram inside! Her's was made not by just running a gathering stitch across the fabric, but by taking a tiny tuck INSIDE and gathering that stitch -- so the stitches don't show. Looks really pretty, and helped me deal with the fact that I had some weird pooching on top of the bonnet (I was able to take a larger tuck in that portion, pulling in the extra fabric to the inside). I wanted the look of more gathering rows than fewer, so I added an extra row:
 |
And there it is! This was really slow going, as all of it (except for the back ring channel) was done by hand. Next up will be figuring out what to do for the inside brim lining -- do I bother with gathering rows, as it'll all probably be covered with lace and trimmings? And I need to figure out some REALLY cheap source for bonnet trimmings!
posted by démodé 12:47 PM
Thursday, April 05, 2007
I've been meaning to do an update for days, but I had to wait until I could deal with hauling out the camera and getting everything set up!
Thanks to everyone for your input on my sleeve dilemma! I decided to go with the bishop sleeve, so a few more yards of fabric are on order.
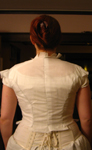
In the meantime, I knew I needed to tighten up the blouse-y bodice front. I experimented a bit with adding extra gathering rows but just hated it, so I ended up turning the fullness into tiny pintucks which are the same measurement as the decorative vertical pintucks. Also, I added a waistband -- I was trying to avoid that, as I'm already short waisted, but I felt like I needed a really closely fitted bit.
After that, I decided that I hated the buttons I was using on the front anyway, so decided to just take them off (and avoid the buttonhole/loop issue). I'm going to do hooks & bars instead. Screw it!
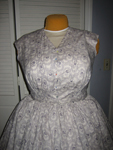 | 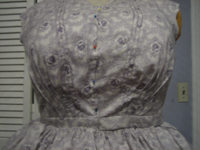 |
I can't believe how much time it takes me to sew -- I feel like everyone else in the world is 500 times as fast as me! All of that took all of Friday night; then I spent ALL OF SATURDAY (we're talking from 12-9pm!!!) putting tucks into the skirt. WTF? Apparently I am the world's slowest sewer. It wasn't helped that I was piecing the tucks, so I had to: take the 1 yard of fabric left and make that into 4 panels (one of which wasn't long enough); split the skirt horizontally where the pleated panel would be inserted, using the removed piece to make up the difference in one of the pleated panels (I used 3 pieces on one panel, so there was a LOT of ironing and french seams hidden inside of pleats); iron and sew the pleated panel; sew the pleated panel into the skirt using french seams. (I'm all about french seams -- they keep things tidy and always turn out much nicer than the period option, bound seams, and basically do the same thing). Of course, for all that work, you can only barely tell that the pleats are there -- but I like them all the same! I think they break up the boring-ness of the huge skirt.
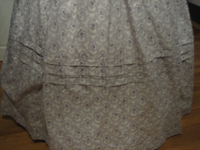 |
I spent a bit of Sunday, and a bit of time the last few nights, on gauging (aka cartridge pleating) the skirt. Although by the mid-1860s most skirts were box pleated, cotton dresses were still gauged, and hey, I like the look! I've got half of the skirt sewn on, the rest is just pinned on, but I wanted to see how things look:
The one thing I forgot is that I need an extra bit of waistband, as the skirt closes in the left side front. I've seen this on a number of period examples, and it's cool b/c you can then open the bodice CF but not have a seam up the center front of the skirt. So I need to make and attach a little bit for the cross over.
So left to do: make that extra waistband bit, finish attaching the cartridge pleating, add closures. When my extra fabric arrives: make and attach the sleeves. Then it's on to the bonnet and parasol -- and I have plenty of time for that! Yay!
posted by démodé 1:02 PM
Wednesday, March 28, 2007
So what do you think? I mocked up the sleeves from Simplicity 5442 (bishop sleeve) and 7212 (coat sleeve). I think I like the bishop sleeve better, even though it's ha-uge (it has a nice cut to it -- excellent inner arm scoop, and it looks exactly like period photographs!) -- but it requires more fabric than I need (must sell crap on ebay!). The coat sleeve is designed to be cut above the wrist and worn over an undersleeve -- if I do that, I'll need to extend the length.
Please pardon how deathly scary I look in these photos -- it was a loooong day:
If I do the bishop sleeve, I DEFINITELY need to do some more gathers in the bodice front to control the fullness -- otherwise I will be the Staypuff Marshmallow Man!
posted by démodé 9:49 PM
Monday, March 26, 2007
I got a lot done this weekend, although I don't have many visuals to prove it.
First I measured out and put together the skirt panels. Matching the pattern was annoying -- I thought I had cut the panels so that they pretty much matched, but of course it was off about .5" -- so each time I sewed one skirt panel to another, I lost .5" for a total of 2". I'm getting down to the wire on fabric, so that means that I don't have enough fabric to do tucks in the skirt. I'm trying to decide if I should order another 3 yards of the fabric (which is cheap - only $4.50/yard) so I can insert a row of three horizontal tucks about 2/3 of the way down the skirt. It'll add visual interest, but I'm REALLY broke right now so even $15 plus shipping seems like too much (esp. as I just spent $28 on millinery wire that it turns out I don't need - le sigh! I know, at least I can put it aside for future projects, but still...). If I did, I think it would be easy to make the tucks, then sew the tucked portion into the skirt (hiding the seams behind the tucks).
After putting the skirt panels together, I hand sewed the hem. I just can't help it, I love handsewing and it always looks so much better than machine, so it's always worth the time.
Then I tried everything on, both to make sure that the bodice was fitting without pulling and to level the hem on the skirt. Here's a REALLY fuzzy, indistinct photo:
 |
I sometimes grumble that hoop era is one of my least favorite, but then I forget how girlie and fun it is to put one on! I had a good time swishing around the house in my frilly white undies and looking at my lavendar froofiness.
Next I finished the edges of bodice neckline and waist with bias strips, sewing a piece of twill tape to the seam allowance of the neckline for reinforcement. I debated piping the seams on this, but decided against it as I don't want the seam allowance showing through the sheer fabric. I machined the bias to the neckline and waistline edge, then handsewed it down to act as a facing.
I'm hemming and hawing about closures. I've pretty much decided to use some small ivory-colored buttons that I got as part of a kit for a corset cover class that I took at Costume College (but ditched out of about 30 min. in -- at least by using the buttons I got a little bit of my money's worth!), but that means I need to make handsewn buttonholes which always never end up well for me (I always get a circular shape to the opening, rather than a slit). I don't want to deal with bound buttonholes (the buttons are way too small!), and there's no way I'm slapping machine made buttonholes on this sucker! And I don't want the gaposis that comes with hooks & eyes/bars.
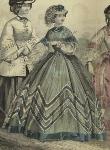
The other thing I'm thinking about are sleeves. Meg would need far too practical of a dress to do pagoda sleeves; do I do a bishop sleeve like the lady in the second row left, or a coat sleeve like the lady in the top row right? I'm thinking bishop would be good with the froofiness of the sheer cotton style, but the coat sleeve could be better on me as it'd be more slimming. (Does anyone know of any pattern sources for a bishop sleeve? I'm trying to decide how it would be cut so I can mock it up. And no, I don't want to buy a commercial pattern just for the sleeve! I did check Arnold, Hunnisett, and Waugh but no go. Is it just a rectangle, or is there shaping to it?).
As I wanted to avoid deciding about buttonholes and sleeves, and as I don't want to attach the skirt until I've decided about the tucks, I spent an hour or two on my bonnet -- but more on that in another post!
posted by démodé 2:15 PM
Thursday, March 22, 2007
I finally got the camera back, so I can prove that I actually worked on this last weekend!
Before cutting out the pieces, I made pintucks for the bodice fronts and center back. I was all excited to get a pintuck foot for my machine, only to find it doesn't REALLY make pintucks, just sort of faux-tucks. So back to the old fashioned method. I didn't want to deal with needing to get the pintucks perfect after I'd cut out, so I put them in first and then cut out around them.
Putting the bodice together was standard and easy. I was all set to blaze along in a path of glory with my darted bodice, when I had a conversation with my friend Bridget who informed me that cotton dresses were ALWAYS gathered, never darted. My first thought was, "So?" but you can guess how long that lasted... so I darted the lining and gathered the lawn fabric. Here's hoping it looks okay -- I may add a few extra gathering rows if necessary.
I pretty much followed the construction of the sheer 1860s dress in Costume in Detail -- the lining is sewn into the bodice at the side seams, side back seams, and armholes, but finished separately at the shoulders, neck, and front opening. I put a casing into the lining (just a bias strip) because you KNOW it'll gap, and I'm going to put a 1/8" purple ribbon.
Now I'm trying to decide how large I want the skirt circumference to be. Need to measure my hoop and petticoat.
Last night I started thinking about my bonnet -- I'm going to be making a drawn bonnet based on one I started (but luckily never finished!) in a GBACG workshop last year -- but I need more millinery wire, so I have to head over to Lacis this weekend to pick some up. So more about that another time!
posted by démodé 2:39 PM
Saturday, March 10, 2007
I sewed! It's true! Just a mini-update...
I haven't touched this thing in months -- see life, busy.
Last weekend I went to the GBACG Little Women costume salon where I looked at about 5 million photos of sheer dresses. Lots of gorgeous dresses, but nothing that worked for me beyond confirming my suspicion that a high V neck is an acceptable option.
The one potential style I saw was a plain fitted bodice that instead of front darts had the fullness gathered at the waist. Tonight (bedroom cleaned, lots of caffeine, don't have to get up early tomorrow for the first time in like 2 months) I mocked that up, but I still didn't like it. In particular, because most of the fullness for me is around where you'd put the closest-to-the-side dart, so the V-ing in of the fullness just looked strained and weird.
So I went back to the Cold Mountain dress idea -- plain fitted bodice (darts in front, princess seams in back) with 3 small pintucks V-ing towards the CF in front, and 3 small pintucks vertically at the CB. I'll echo this with 3 horizontal tucks in the skirt near the hem.
So it doesn't look like much, but:
A) It's sewing!
B) It fits
C) The pattern is completely done, which means it's on to the REAL fabric next (yay!)
I have a lame habit of always draping from scratch - although I save all my patterns, I hardly ever reuse them. As I went to drape yet another style, and was feeling grumpy about all the mockups and trueing I'd have to do, I gave myself a stern talking to and hauled out the pattern for my 1875 candy cane day bodice.
I knew the fitting was a little weird on that, so I still did a mockup (also to check for where the neckline on the half-high lining should go). I'm glad I did, because I tweaked a few things, most especially taking a horizontal tuck in the bodice front (hence the weird wrinkling on my candy cane bodices!) - it looks like a big wrinkle in these photos, but don't worry, I drafted it out.
So here it is! I finished the pattern for both the bodice and lining. Tomorrow (hopefully) I'll start making the bodice!
 |  |
posted by démodé 1:14 AM
Monday, February 05, 2007
I've been wanting to sew lately, but hemming and hawing about what to start first. I was thinking I'd work on my Daniel Deronda dress, as I have lots of time before my first deadline, but I am just loathing the thought of making that petticoat. So I thought, well, why not work in event order, and get this one out of the way?
I've always LOVED Little Women -- I've probably read the book about 50 times, and despite Winona Ryder not being right for the part, I love the film adaptation. I had the idea to do a Little Women event, because it would be an easy era to do (so many Bay Area people have Dickens Fair or Civil War costumes). I (like most of us) am probably a Jo at heart, but I decided (hey, it's my event!) I wanted to be Meg. She's my second favorite, probably because of being girlie and the whole ball scene. And I just don't want to make a tomboy costume!
The project really started when I found this beautiful vintage ribbon, which I knew would be perfect for a bonnet, at Costume College:
 |
And then the hunt was on -- I knew I wanted to make a sheer cotton dress, and my dream fabric was a cotton lawn with a white background and small lavender flowers. Apparently this is a tall order -- who knew? I could find sheer cottons with pink flowers, red flowers, blue flowers, but not a thing in lavender. I could find lavender in cotton broadcloth, but I so wanted the sheer look. I looked at every online fabric store in existence at least once a week for MONTHS. I searched ebay at least once a week for MONTHS. And I finally gave up! I found this sheer cotton lawn in lavender; it's not quite what I wanted, but it'll do:
|
Then the next consternation came with designing the dress. No matter how girlie she is, the reality is the March family just doesn't have any money. Dresses were hand me downs and probably worn for years. I'm probably stretching it a bit even to say that Meg has a summer dress as opposed to just a few, all purpose day dresses. So the design of the dress can't be too complicated -- it has to be practical. No big pagoda sleeves, no excess fabric use (flounces etc.), little trim. Probably Meg would spend as much time as needed on sewing, so I could do things that involve labor but not money (and, I assumed, although she couldn't always buy the most up to date dress, Meg cared enough about clothes to be stylistically up to date when possible, so I knew I'd go with a round waistline). So I steered myself away from the mid-1860s fashion plates I'd been admiring. I did check out the dresses Meg wears in the movie, but none of them yanked my chain.
Instead, I found inspiration in these:
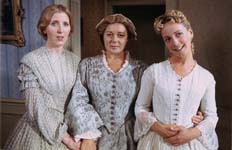 |  |  |  | | He Knew He Was Right | Fingersmith (same dress as far left in He Knew picture?) | Cold Mountain |
Looking at extant garments, almost all of them were some variation of the shirred front bodice (often with huge sleeves and flounces printed à disposition, but of course I would skip those elements). I particularly focused on these two dresses in Costume in Detail:
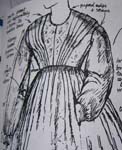 | 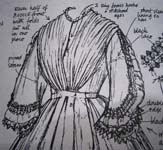 | 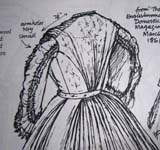 | | Late 1850s pleated bodice | 1864-65 sheer wool gathered bodice |
So, on to the draping of the bodice! I knew I wanted to construct the bodice like the 1864-65 sheer wool dress, with a short sleeve, lower necked lining (to take advantage of the fabric sheerness and for coolness):
So I started by draping the lining -- simple, round waistline, dart fitted:
And then did a mockup, then cutout and assembled the actual lining:
Then it was on to draping the bodice itself! Originally, I was thinking I liked the pleated bodice best (of the two in Costume in Detail), but thought instead of carrying the pleats all the way up to the shoulder seam, I'd gather it there for a less structured look:
I wasn't sure if I liked that, so I thought I'd try a gathered waistline like the sheer wool dress:
Didn't like thought; thought I'd try a bunch of smaller pleats at the waistline. That seemed to work, so I draped the back too (based on the sheer wool dress):
And then made a mockup, which I hate!
I feel like I'm wearing a giant, puffy bib, and it's not a good thing. Is it just the heavier muslin (maybe), or is this another What Not to Wear moment (larger busts needing something to break up the bustline)? Do I:
1. Try to put some kind of yoke in there to flatten out and breakup the bust area?
2. Go back to the sewn down pleats in the 1850s bodice from Costume in Detail?
3. Do a V neck (unlikely that Meg would have enough dresses to have a dress that could really only be worn 3 months out of the year, but far more flattering on me) like the Cold Mountain dress?
4. ... or a square neck, like this one, again from He Knew He Was Right?
posted by démodé 12:28 PM
|

)
)
)
)
)
)
)
)
)
)
)
)
)
)
)
)
)
)
)
)
)
)
)
)
)
)
)
)
)
)
)
)
)
)
)
)
)
)
)
)
)
)
)
)
)
)
)
)
)
)
)
)
)
)
)
)
)
)
)
)
)
)
)
)