démodé
adjective:old fashioned, out of style, unfashionable [from French, the past participle of démoder "to go out of fashion," from mode "fashion"].

the concept
 |
| 1839 Le Follett day dress |
the fabric
 |
| sage & cream silk poplin |
the pattern
the deadline
the result
what's on the dvd player?
 |
| Jane Eyre |
useful links
bibliography
|

Tuesday, January 02, 2007
I turned into a TOTAL lagger over Christmas break. Sorry! Apathy was me, especially about updating around here! But I really did finish this dress, and I did wear it, and I really should document that fact.
The big trauma happened when I put this on the morning we were going to the faire, when I actually bothered to put my Victorian chemise (which has a very fitted yoke). The fit of my bust was COMPLETELY different from the tank top I had been using before -- there was definitely less bust fullness, and the dress fitting above the corset line just looked like crap. I'm grumpy, too, because I realized that the only way to fix this will be to totally take apart the bodice, which I don't know if I'm up for...
The bonnet trimming turned out well -- I used a wide brown satin ribbon with a narrower beige/brown striped ribbon, plus a brown feather and off-white flowers. The only issue was that I'd made a gathered lace ruffle to go inside the bonnet, and I wasn't entirely sure where to put it. I replaced it a number of times, but when I'd finally done my hair and put on the bonnet, it was way too far back on the head and you can't even really see it. Plus, the bun I did was very low, and didn't give me a good place to attach a hat pin, so I felt like the bonnet was falling off my head the whole day.
So, in the end, I was pretty grumpy about wearing this and felt like a frump. Add that to the massively horrible traffic we had on the way to the fair, and I was NOT a happy camper.
But here it is, in all its glory:  |  |
posted by démodé 3:32 PM
Saturday, November 25, 2006
Done! Nothing exciting to report: I sewed on the last hooks & bars, made the collar, and made the belt.
Last night I worked on trimming my bonnet, which is turning out very nice. I just need to pick up some lace for trimming the inside.
I'll post final photos after 12/10, when I'm going to wear it to GBACG day at Dickens Fair.
posted by démodé 1:51 PM
Tuesday, November 21, 2006
Sewing! Right! That's something I do! And hey - I have this blog where I post about sewing! Note to self: sew! Update your blog! Stop being a dork!
Why do I start nearly every post this way?
So I ripped off the hem ruffle (sigh) and resewed it (sigh) to the skirt in its proper placement. And then I sewed the skirt to the bodice, only to discover that the cartridge pleated section in the back was wider on one side than the other (sigh).
And then I got distracted into making a modern jacket -- this is impressive because I NEVER make modern clothes. So I kinda sorta spent two weekends on that. (I'll post a pic once I take one.)
So then once the Distracting Jacket(TM) was done (yesterday!), I hauled this puppy out. I ripped out the cartridge pleats in the skirt on the problematic side and resewed them.
I think part of the reason I lost steam on this is because I was worried about fit. It seemed like the last few times I tried it on, my husband had to really tug to pin it shut.
So I sewed on some of the hooks and bars before running out, and tonight did a try on. I tightened my corset more than usual, although not to an uncomfortable point (I don't believe in suffering for beauty) -- and when we hooked it shut, it fit perfectly! Yay! HA-UGE relief! I was amused to find I'd sewed a pin into the cuffs, so had a fun 5 minutes working that sucker out.
But here ya go:
I was not-so-thrilled to find that the 1950s pointy bust that I'd been so confident I could get rid of easily turned out to be not so easy. There's some extra room in the bust area -- not in terms of ease, but in terms of the hollow above my bust on the side -- and I just can't get the top of the dart to lay flat. I ended up sewing the darts way higher than usual, and there's still a little pucker, but all the pinning and basting I tried didn't deal with it. So I'm going to suck it up.
I'm also not thrilled with the huge top/side/bust wrinkling near the armhole, a product of the dropped sleeve. I decided to experiment with padding that area, which you can see on the right in the above pictures (left side is unpadded). I think it definitely helps, so I'm going to make some small, flat (mine were about 1/4" thick) to baste in there.
I also made a placket for the skirt opening, which I need to sew into place.
So, left to do!
- Buy more hooks & bars, small silver hooks & eyes (I have 5 million black ones and about 1 million large silver ones!)
- Finish sewing in hooks & bars in back opening
- Sew hooks & eyes into cuffs
- Handsew in skirt placket
- Fit lace collar, hem, and baste in
- Figure out headwear
But that's all easy peasy stuff - yay!
Now I'm starting to think about what's next, but that's another post...
posted by démodé 11:40 PM
Monday, October 23, 2006
I promised you content, and content you shall get! Despite being depressed about various personal stuff, or perhaps because of it, I've been able to keep working on this project (sewing keeps me sane!). Most of the work has been of the cutting-and-making-corded-ruffles variety... whew! Me, my rollie cutter, and my piping foot have become close friends, I tell ya!
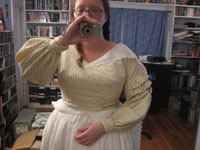
So I sewed on the sleeves and the waistband, and finished piping/binding the top edge of the bodice. Look how Jane Eyre I look - hee! Still have that 1950s pointy bust thing going on, which really WILL get fixed as soon as I get around to it.
The fashion plate shows the bodice with an embroidered lace collar. I just happen to have some nice wide swiss embroidery hanging around (it was supposed to be engageantes, but wasn't long enough), so I think I will baste that into place. Here's a test run:
 |
I'd already cut out and sewn together the skirt -- I love skirts of this era, they are so easy. It's just 3 panels of the 45" wide fabric. I did hem the thing by hand before realizing that'll get covered by the ruffle -- oh well, I'll know it's there, right?
I figured it would be way easier to make and attach the skirt ruffle before levelling and sewing the skirt to the waistband, so I spent many a night cutting out bias strips. The skirt ruffle is just a wider version of the sleeve ruffle -- a piped bias strip of the stripe, backed with the ivory poplin. I had to make YARDS of it, and it got really confusing when I realized I had enough cording for the finished length but not for the ungathered length -- so I had to do lots of "sew half, gather ruffle and push out the way, sew other half."
Looking at the skirt, I thought I'd align the seamlines with the CB and side bodice (about where the bodice cross-over ends). It seemed that like would work, so I did all the work of gathering, pinning, and sewing the ruffle to the skirt. The best part was the ruffle covers the pocket slit. Here's what it (roughly) should have looked like):
 |
Except when I actually pleated up the skirt to the waistband, the ruffle ended up almost at the side seam!
Which means that I get to unpick the ruffle and resew it, as I think it looks dorky that far off to the side. Looking at the fashion plate, it looks like the ruffle is supposed to align with the bodice cross over. Oh well, second time's a charm, right?
Here's what the back will look like -- the unpinned/pleated portion of the skirt will be cartridge pleated:
So -- fix the skirt ruffle, attach the skirt to the waistband, finish up all the random handsewing I need to do on little bits and pieces, add closure, make a belt. And then figure out what I'm going to wear on my head!
posted by démodé 12:34 PM
Wednesday, October 04, 2006
There's been more work on this project than you might think, given the level of posting around here, but I couldn't find my camera for the longest time -- and I always think posts without photos are boring.
I started by mocking up the 1837 sleeve from Hunnisett -- it fit, but it was too leg o' mutton (it had the fitted top with full lower sleeve, but that sleeve got too narrow towards the wrist. Um yeah, just like the design illustration. Might have been good if I had really looked at that). So then I mocked up the 1839 sleeve, to which Trystan can attest that Jean Hunnisett was high when she drafted it (there's just no way that the lower, full part of the sleeve doesn't need to be doubled -- the pattern illustration shows it being one full piece, but that basically made a fitted sleeve. Once I doubled that piece, it fit perfectly and had the right look).
All this mocking up happened during the Era of the Missing Camera, so shall go undocumented.
So then it was on to the great cutting out! As previously noted, I was really freaked out about not having enough fabric for the key design element of the skirt ruffle. So I set about cutting all the remaining pieces (waistband, belt, sleeves, piping) to see what I'd have left over. I knew I wanted to back the sleeve and skirt ruffles so as to avoid having a hem stitching line, and was excited to realize I had a couple yards left over of the matching solid cream poplin that I used for my 1780s robe a l'anglaise - yay! So I cut the waistband out of that (knowing that the waistband will be covered by the belt), as well as a backing for the sleeve and skirt ruffles. And glory hallelujah, by being extremely judicious in my cutting I was able to eke out enough fabric to do a 5" wide skirt ruffle!! This was literally all the fabric I had left over:
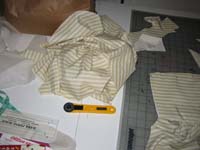 |
Then it was on to assembling the sleeves. Here's what the basic sleeve looks like, laid flat for trimming (without the seam sewn shut) -- it's got a fitted piece at the top, to which ruffles get sewn on the lower portion, plus a full portion that goes from above the elbow to the cuff:
The ruffles above the full part of the sleeve were cut from piped bias strips, backed with the solid cream poplin, and gathered on their cord to fit. Here's the bias strip being sewn to the cream backing (fascinating, I know):
Then I sewed the piped ruffles to the flat sleeve:
Finally I sewed the lengthwise seam up -- and had one of those "YAY! It looks like the fashion plate!" moments:
 |
posted by démodé 12:01 PM
Sunday, September 17, 2006
Look - sewing! Wow!
There are other projects my costume ADD-afflicted brain is more excited about, but this is the only one for which I have A) 99% of the materials on hand and B) an upcoming deadline (Dicken's Fair - gotta have something new to wear!). So this one it is - an 1839 day dress from Le Follett.
I know you 1830s haters will pshaw this sucker, but I have a not-so-secret soft spot for 1830s -- especially the last few years, when the crazy huge sleeves turn into pretty demure sleeves, before the harsh lines of the 1840s. And this dress has had my eye for a long time because -- look! Stripeys!
I'm making it out of this sage and cream striped silk poplin that I bought years ago for a 1780s dress (which ended up being made out of a more exciting fabric). I think it's a good choice for this, as it has the stripes (stripes!) and has subtle coloration, which again goes well for the demure prettiness of the late 1830s. Of course, whether I am demurely pretty is quite another issue that we shall leave aside (hey, nearly 6' women [if they existed] had to get dressed in the 1830s too!). My only concern is whether it will turn out to be very summery, especially as the only 1830s bonnet I have is straw, and I am way too broke to consider buying a new one (or supplies to make one).
Okay, so this is what I spent my weekend on! I started by mocking up the back of my 1836-7 evening dress, and draping the front. Here's the lining mockup, from straight-off-the-draped-pattern and pinned, to refitted and pinned, to basted:
I've still got some 1950s cone-bra pointy-ness going on at the bust there, but that'll have to be adjusted when I get unlazy enough to try the sucker on again (an easy last minute fix).
The bodice will match the lining in back; the front has the cross-over that you see in the fashion plate. I wasn't 100% sure how this would work -- the fashion plate doesn't show any darts/gathers, but then that woman is shaped like a pencil. I briefly thought about gathering the front instead of darts:
... but decided against it.
After cutting out all my pieces, I got out my trusting basting spray and "basted" away. The lining front got sewed together at the CF, with the cross-over laying on top of each other. I almost got inspired to sew that down at this point, but then realized that I'd better put the darts in first as the cross-over lays on top of them - duh!
Sew I sewed in the darts and put the bodice together first, piping all the seams (I LOVE stripey piping). I have two cool new toys -- an actual piping foot for my machine (HALLELUJAH! No more zipper foot!), and a ruler thingie called the Darr Piping Magic that I saw advertised in Threads (which helped me overcome the disreputable looking website!), which I am very enamored with. Once you've made your piping, you use the handy marked slots on the ruler thingie to cut perfect seam allowances -- there are spaces from 1/4" to 5/8". You put the corded part of the piping into the slot that corresponds with the width you want your seam allowance to be, then you use your rolly cutter to slice off the extra seam allowance. This made it SUPER easy to line up my piping on the seams, as I knew I could exactly match the edges. The only annoying thing is it doesn't work if you want different length seam allowances -- for binding edges, I usually do a narrow (.5") SA with a much longer one on top (which becomes the binding) -- I was hoping I could open up the seam allowances and just slice one, but it gets squigy and I think the measurement would be off. If that made any sense.
So once I'd assembled and piped everything (except I still need to do one armhole), I hand sewed down the cross-over bodice (stitching in the piping ditch so it doesn't show). I briefly considered just machining it late Sat. night, but then realized that was my tip that it was time for bed.
Here's what it looks like now:
I ripped my panels for the skirt pieces, which will be very easy to make. Now I need to pattern (from Hunnisett) and make the sleeves -- I'm worried about having enough fabric to make sleeves AND the bias ruffle around the skirt, which is a key design element here.
Oh, in case you have a yen to comment, I'm slowly integrating a new commenting system onto the site (using Blogger's comment feature, which deals with the annoying problem Haloscan has been giving me of losing the # of comments on old posts [the comments are still there, but you can't tell because it shows 0]). If you have (or want to get) a Blogger account you can use that to comment, or you can also comment anonymously. Let me know if it gives anyone any problems.
posted by démodé 8:01 PM
|

)
)
)
)
)
)
)
)
)
)
)
)
)
)
)
)
)
)
)
)
)
)
)
)
)
)
)
)
)
)
)
)
)
)
)
)
)
)
)